Don't miss your chance to get this versatile Peaceful Deer bundle before it's gone! Not only did I make some great Christmas cards with it, I also made this masculine birthday card. Win-Win since I love to use my Christmas bundles for more than Christmas and I sometimes struggle with masculine cards.
----------------------------- Sue Root, Independent Stampin' Up! Demonstrator ------------------------- stampin_sue@outlook.com........................................................................Raleigh, NC (Garner area) >>>> CURRENT HOSTESS CODE - E6M96ARH
Sunday, January 2, 2022
Peaceful Deer Birthday Card
Thursday, December 30, 2021
Tidings and Trimmings Wreath
I know Christmas is over, but I wanted to share this idea using the Tidings and Trimmings Bundle.
You could use a different word under the wreath and use this card throughout the winter.
Sunday, December 19, 2021
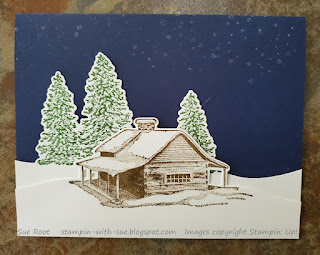
Peaceful Cabin Cards
Sunday, November 28, 2021
NC SU Demos Blog Hop - Don't Limit Your Stamps
Toni Campana
Amanda Howard
Frances Wagner
Sue Root
Tracie Evans Langley
Monday, November 22, 2021
Tidings and Trimmings Star Card
Here's a card we made in my recent Stamp-a-Stack. It's made with the Tidings and Trims Bundle.
It's a little hard to see, but I stamped leaves on the 3.75" x 5" layer of Evening Evergreen with Evening Evergreen ink before adhering it to the card base. This just gives a little more visual interest to the card and adds some depth. The star is made up of two die cuts. The Cherry Cobbler star is flat, but the Basic Vanilla is popped up with Stampin' Dimensionals.
Supplies:
Bundle: Tidings and Trim
Cardstock: Cherry Cobbler, Evening Evergreen, and Basic Vanilla
Ink: Cherry Cobbler and Evening Evergreen
Monday, November 15, 2021
Time of Giving Fall Card
I had a lot of fun making this card. I especially love how the brick wall turned out. The brick background was made by running a piece of Sahara Sand cardstock in the Brick & Mortar 3D embossing folder through the Stampin' Cut & Emboss Machine. Then I used my sponge dauber to rub Cajun Craze ink over the embossed piece. The key is to rub the ink on gently so that it colors the raised bricks and leaves the non-raised parts Sahara Sand color so that it looks like mortar between the bricks. I also did it so that the color wasn't solid, just like real bricks.
The leaves and the pumpkin were die cut with the Giving Gifts dies and the Thankful stamp is from the Time of Giving stamp set. These are available together in a bundle. The leaves were sponged with various colors using my sponge daubers. I used Old Olive, Cajun Craze, Pumpkin Pie, and Crushed Curry ink. When cutting the scene dies from Giving Gifts, an outline is left around the die so you have to make sure your piece of cardstock is sized to leave the size border you want around it. In this case, I used a die from the Stitched Rectangle dies to cut a Pumpkin Pie rectangle and then ran the rectnagle through the Stampin' Cut & Emboss Machine again with the pumpkin die centered on it. Thankful is stamped on the same size rectangle. The Cajun Craze border underneath was cut to size using my Paper Trimmer. I chose not to use a Stitched Rectangle die for the Cajun Craze layer because the next size rectangle was bigger than I was looking for. The card base is Basic Vanilla. Both of the rectangles are popped up using Stampin' Dimensionals. All of the leaves are flat, except the one on the far left is popped up with just a partial small dimensional at the stem end and then flat on the other end.
Thanks for stopping by my blog today. I you enjoyed the card and the directions on how to get your Brick & Mortar embossing to look like real bricks with the mortar showing in between.
Monday, November 8, 2021
Pretty Pumpkins in Non-traditional Fall Colors
Monday, November 1, 2021
Pretty Pumpkins Fall Card
Thursday, May 20, 2021
Dragonfly Garden Trifold Card
Hi Stampers! Today I have a trifold card made with the Dragonfly Garden stamp set. I also used the Dragonflies Punch. These two items are available as a bundle.
After stamping the flowers in Garden Green, I colored them with Garden Green and Daffodil Delight Stampin' Write markers. Then I stamped and punched the dragonflies with Memento Black ink on Calypso Coral cardstock. They were popped up with Stampin' Dimensionals. The Basic Rhinestones add a little sparkle.
Basic Directions:
1. Score 12" x 5.5" piece of Garden Green cardstock at 4" and 8".
2. Using your score lines as a guide, fold the right panel in, lining it up just inside the 4" score line. Then fold the left panel over to the edge of the card. Use your bone folder to get crisp folds. This will give you a 4" x 5.5" card.
3. Complete the 4 Garden Green panels next. Stamp the flowers in Garden Green and then adhere punched out dragonflies as shown in the pictures. I recommend not popping any of these up as it will make the card not close as nicely.
4. Adhere a 3.75" x 5.25" layer of Daffodil Delight cardstock on the front panel of the card.
4. Stamp flowers on 3.5" x 5" piece of Basic White cardstock. If I make this card again, I'll move the stamp on the right down a little bit so the top flower isn't as covered by the dragonfly. Add punched dragonflies with Stampin' Dimensionals and then add Basic Rhinestones. Adhere this layer on top of the Daffodil Delight layer.
5. For the inside center panel, stamp a 3.75" x 5.25" piece of Basic White cardstock as shown in the picture above. If you decide to change it up a bit, remember that this is where you will write your message, so be sure to leave room for that. Adhere with Stampin' Seal.
I hope you'll give this card a try. It's a fun way to give a little extra something to a card without having to master a bunch of cuts and folds. Plus, it gives more room to stamp! If you have any questions about the directions or anything else stamping related, leave me a comment and I'll get back to you.
Sunday, February 28, 2021
NC SU Demos Blog Hop - Shake, Rattle & Roll
Hi Stampers! Welcome to the February NC SU Demos blog hop where the theme is Shake, Rattle & Roll. We will all be sharing projects that have some sort of movement. I'm sure you'll enjoy seeing the variety of projects in this month's blog hop. If you are following through the hop, you probably just came from Joanne's blog. Wasn't her project fantastic? After you finish reading my post, please leave a comment, and then hit the next blog button to go the next blog in the hop which will be Tina.Today I have a shaker card to share with you, but it's not the usual type you might be used to. This one uses one of our clear envelopes to create the area for the sequins. I also used the Whale Done bundle, Whale of a Time DSP, and some ribbon.
Amy Kinler
Toni Campana
Sharon Maranich
Tracie Evans Langley
Jo Anne Hewins
Sue Root - you are here
Friday, February 12, 2021
Another Friends Are Like Seashells Card
Here's another card featuring Friends Are Like Seashells.
Thursday, February 11, 2021
Die Cut Friends Are Like Seashells Card
The Seaside Seashells die set has one large die and several smaller ones. This card was made with the large die from that set and the Friends Are Like Seashells stamp set. These two items are available individually or as a bundle. When you buy a bundle, you get a 10% discount versus buying the products individually.
I hope you enjoyed today's card. I'll have another card made with this bundle on tomorrow's post.
Wednesday, February 10, 2021
Friends Are Like Seashells Simple Stamping Card
Recently I was part of an online Open House where a half dozen demonstrators got together and showed off different products. I highlighted the the Friends Are Like Seashells Bundle and Seashells Embossing Folder. My goal was to show how the items can be used separately and together. Over the next several posts I'll share those projects here.
Shell Colors: Petal Pink, So Saffron, Pool Party, and Balmy Blue. Dot Color: Mint Macaron. Cardstock: Petal Pink, Pool Party, and Basic White.
Thanks for stopping by my blog. Be sure to check back for other projects made with this great set and coordinating items.
Sunday, October 25, 2020
NC Stampin' Up! Demos October Blog Hop

Wednesday, October 21, 2020
Celebrate Sunflowers Again
Tuesday, October 20, 2020
Celebrate Sunflowers
Saturday, September 26, 2020
Rustic Christmas Card
The Mini Catalog is full of incredible items, but don't forget about the Annual Catalog. Christmas card using Rooted in Nature, Buffalo Check Background, and Itty Bitty Greetings stamp sets.
Ink: Garden Green and Tuxedo Black Memento.
Other items: Nature's Roots dies, Linen Thread, and Wink of Stella on the trees.
Friday, September 4, 2020
Stampin’ Cut & Emboss Machine Now Available
Woo Hoo! It's here! The new Stampin’ Cut & Emboss Machine by Stampin' Up! is now available to order!
There are so many great features to this new machine. You are going to love it! There is a full size version and a mini version. Currently only the full size version is available but the mini will be coming soon.
So what sets our machines apart from the rest? Here are some of our favorite features:
- Durable machines with high-quality results. The solid steel construction frame and rubber feet that securely grip the work surface produce crisp, clean, precise cutting and beautifully detailed embossing.
- Easy to use. The machines and tools are designed for an intuitive die-cutting and embossing experience. For example, all plates are labeled with a number and are color coded for easy reference and use when building your sandwich. And just like the name suggests, our Magnetic Cutting Plates have fully-magnetic surfaces to make it easy to securely position your dies and keep them in place.
- Simple to store. The platforms on both machines fold for space-saving storage and they look pretty too–the sleek, clean design suits any crafting space.
- Portable. You can use both machines at home or on the go with their folding platforms and ergonomic carrying handles. This makes it easy to take to crops or other crafting get togethers or to take on vacation or anywhere else you might want to craft.
Both machines come with all the tools needed to get started right away, making it easy to have a fantastic die-cutting and embossing experience from the start. Replacement plates and additional specialty plates are also available.
Adhesive sheets make it easier than ever to adhere your die cuts.
Check out the whole line of die cutting and embossing supplies here. When you order, please select me, Sue Root, Raleigh, NC as your demonstrator. Thank you!
Sunday, July 26, 2020
NC Stampin' Up! Demos July Blog Hop

I had a few issues with the shaker part and I'm going to share because maybe my experience will help you. I was out of Foam Adhesive sheets and tried to make due with what I have. Sequins have already fallen out despite the fact it seemed like I had a good seal. I am definitely waiting until I order new Foam Adhesive sheets before making another shaker card. It is so much easier and effective to just cut use my Layering Circles dies to cut a ring from the Foam Adhesive Sheet. Also be sure to use the Window Sheets. They are much easier to work with and give a better seal than other things you might think about substituting.
Thank you for checking out this month's blog hop. Next up is Nedine DuPree who I am sure will have a wonderful project for you. Enjoy the rest of the blog hop and the rest of your summer!
Jo Anne Hewins
Tina Lesson
Tracie Evans Langley
Toni Campana
Amy Kinler
Ariel Matera
Laurie Meier
Sue Root - you are here
Nedine DuPree