Thursday, December 30, 2021

Tidings and Trimmings Wreath

I know Christmas is over, but I wanted to share this idea using the Tidings and Trimmings Bundle.

You could use a different word under the wreath and use this card throughout the winter.


I used the Layering Circle Framelits to make the wreath base. I used two sizes so that I ended up with an open circle. Then I cut out lots of leaves and layered them on the wreath base. Lastly, I added the sprigs, berries, and bow. This was layered on a 4" x 5.25" piece of wood-grain Designer Series Paper (DSP) from the In Good Taste DSP pack. If you don't have this DSP yet, I highly recommend it. It has a great variety of patterns that I have found super useful. Plus, it's a quite a value at 24 sheets for only $21.00.

Here's how I finished off the inside. Of course, you'd want a different sentiment if you are using it as a winter card. Or, during the slower winter months, maybe you'll want to get a jumpstart on next year's Christmas cards.
 

You still have a few days to get the Tidings and Trimmings bundle before it retires on January 3rd.

Sunday, December 19, 2021

Peaceful Cabin Cards

Here are a couple cards I made with the Peaceful Cabin bundle. The first card is layered on a Night of Navy background.


The second card has a sponged background. You can see some extra hills on that card. That's because it was my first attempt using the Cabin dies and I didn't know that when you use those dies, you want to make sure to leave enough extra Basic White at the bottom so there's not a gap between the layers. I cut the extra hills to cover the base layer that was showing through the gaps. I forget the exact measurements I used, but it was something like stamping the cabin at the top of about a 2" high piece of cardstock. It looks like a lot of wasted space at the bottom, but when you cut it with the die, that's what leaves the snow. Then, the trees were stamped near the top of a piece about 2.25" high. If you visualize how high you want them on your card, it will help you decide how high of a piece to use. In addition to height, consider the length. I used pieces that were 5.5" long so they covered the whole base layer from side to side. Then I decided where I wanted the cabin and trees to fall from left to right. I had to shift where I stamped from where the dies fell naturally. That's okay. I just used my paper snips to cut to the edge in a way that seemed like it kept the same flow.


The last picture is the inside of the Night of Navy card. It's a reminder to put a Basic White layer inside cards that have a dark colored base. It makes the card look more finished plus then you can add some stamps that coordinate with the front and easily write a message.

Sunday, November 28, 2021

NC SU Demos Blog Hop - Don't Limit Your Stamps

Hi Stampers! Welcome to the November 2021 NC Stampin' Up! Demos blog hop where we will be showing you other uses for your stamp sets. You may have just come from Frances Wagner's blog. Wasn't her card cute?
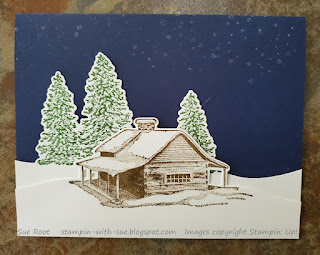
Here's a Christmas card I made using the Christmas Season Bundle. It's a beautiful bundle, but what about when you have all of your Christmas cards, 3-d items, and decor pieces done? Well, keep reading for some ideas to use this bundle for other occasions during the Christmas/Winter season and throughout the year.


Those of you who are familiar with the Christmas Season bundle may recognize that the bottom layer under the sentiment is shorter than the die in the bundle. See below how to re-size the die cut. Colors: Mossy Meadow, Merry Merlot, Crumb Cake, Soft Suede, Basic Vanilla. I also used Holiday Rhinestone Basic Jewels and Linen Thread.

The layout in this second card is similar, but I got rid of the pinecones and added some more plants so it would look less Christmas-y. Now it's perfect for a Winter birthday. This is a one-layer card. The background was done with the Birch background stamp. I think the sentiment is from a retired set as the name is not coming to me right now. Colors: Mossy Meadow, Merry Merlot, Cherry Cobbler, Early Espresso, Basic White. 


Here's one more card in Winter colors. This is also a one-layer card. I covered the middle area of the card and stamped several plants. Once I was done stamping I removed the strip of cardstock from the middle of the card so that part remained white. It looked a little plain so I took a ruler and Stampin' Write marker to line the edges of the white area. The sentiment is from Celebrate Sunflowers and is great for a Congratulations or Birthday card. Colors: Garden Green, Old Olive, Merry Merlot, Cherry Cobbler, Basic White. I added a few Basic Rhinestones to bling it up a bit.


This bundle isn't limited to Winter colors. Check out this birthday card done in Spring colors. It's a similar layout to the first card, but I used a whole lot more dots and doubled the Highland Heather plant. Other colors: Balmy Blue, Petal Pink, Basic White. The sentiment is from Timeless Tulips.


As promised, here are instructions on how shorten your die cut so it gives an even border around your sentiment. I started with a 1" x 3" piece of cardstock. Run it through the Stampin' Cut & Emboss Machine with just enough cardstock sticking out the end so you know you won't cut off the end. Notice how the piece does not go the whole way to the end. It will fit on a 1" wide piece but you have to position it just right. If you are nervous about this, just cut your piece a little wider.


Now line it up the other way, so the die shows a little bit of the straight end sticking out. You can see the cut end in the middle of the die. If you position it right, you can feel the edges of the cut piece sort of click into place. This die and the cardstock really are straight. I think my camera must not have been straight, which is why it looks like it gets wider at the one end.

The bottom piece of cardstock shows that the die really fit on that 1" piece and shows you how little extra space there is.


And one last card using the original layout, this time a thank you card in Fall colors. The sentiment comes from Best Birds. The labels are rectangles cut with my Paper Trimmer. Colors: Cajun Craze, Crushed Curry, Old Olive, Sahara Sand, Basic White.


As you can see, there is no need to limit your stamps and dies - even ones with Christmas right in the name. I've shown you birthday, thank you, and let's celebrate you cards in not only Christmas/Winter colors, but Spring and Fall.

I hope you've enjoyed all of these ideas for using your Christmas stamps in non-traditional ways. Continue on the next blog in the hop, which belongs to Tracie Evans Langley, to see even more inspiring ideas.


Monday, November 22, 2021

Tidings and Trimmings Star Card

 Here's a card we made in my recent Stamp-a-Stack. It's made with the Tidings and Trims Bundle.

It's a little hard to see, but I stamped leaves on the 3.75" x 5" layer of Evening Evergreen with Evening Evergreen ink before adhering it to the card base. This just gives a little more visual interest to the card and adds some depth. The star is made up of two die cuts. The Cherry Cobbler star is flat, but the Basic Vanilla is popped up with Stampin' Dimensionals.

Supplies:

Bundle: Tidings and Trim

Cardstock: Cherry Cobbler, Evening Evergreen, and Basic Vanilla

Ink: Cherry Cobbler and Evening Evergreen


Monday, November 15, 2021

Time of Giving Fall Card

 I had a lot of fun making this card. I especially love how the brick wall turned out. The brick background was made by running a piece of Sahara Sand cardstock in the Brick & Mortar 3D embossing folder through the Stampin' Cut & Emboss Machine.  Then I used my sponge dauber to rub Cajun Craze ink over the embossed piece. The key is to rub the ink on gently so that it colors the raised bricks and leaves the non-raised parts Sahara Sand color so that it looks like mortar between the bricks. I also did it so that the color wasn't solid, just like real bricks.

The leaves and the pumpkin were die cut with the Giving Gifts dies and the Thankful stamp is from the Time of Giving stamp set. These are available together in a bundle. The leaves were sponged with various colors using my sponge daubers. I used Old Olive, Cajun Craze, Pumpkin Pie, and Crushed Curry ink. When cutting the scene dies from Giving Gifts, an outline is left around the die so you have to make sure your piece of cardstock is sized to leave the size border you want around it. In this case, I used a die from the Stitched Rectangle dies to cut a Pumpkin Pie rectangle and then ran the rectnagle through the Stampin' Cut & Emboss Machine again with the pumpkin die centered on it. Thankful is stamped on the same size rectangle. The Cajun Craze border underneath was cut to size using my Paper Trimmer. I chose not to use a Stitched Rectangle die for the Cajun Craze layer because the next size rectangle was bigger than I was looking for. The card base is Basic Vanilla. Both of the rectangles are popped up using Stampin' Dimensionals. All of the leaves are flat, except the one on the far left is popped up with just a partial small dimensional at the stem end and then flat on the other end.

Thanks for stopping by my blog today. I you enjoyed the card and the directions on how to get your Brick & Mortar embossing to look like real bricks with the mortar showing in between.

Monday, November 8, 2021

Pretty Pumpkins in Non-traditional Fall Colors

Here's a quick Fall card in non-traditional colors.


Stamp Set: Pretty Pumpkins. Colors: Crumb Cake, Rich Razzleberry, and Basic Vanilla. Embossing Folder for background: Star-Crossed. Linen Thread around the bottom.

I don't know why it looks wavy but the bottom is straight in real life. Hope you enjoyed today's card. Thanks for stopping by my blog.

Monday, November 1, 2021

Pretty Pumpkins Fall Card

Have you seen the Pretty Pumpkins bundle in the Mini Catalog? The more I play with it, the more I love it! The whole bundle is great, but I particularly love the details on the tall pumpkin and the design on the stamped pumpkin. We made this card in one of my classes recently.


Supplies:

Pretty Pumpkins Bundle (Item number 156478)

Stampin' Cut & Emboss Machine

Basic Vanilla cardstock: 8.5" x 5.5" card base, 3.75" x 5" layer, and a scrap (I think it was about 2.5" or 2.75" square) for the pumpkin

Cajun Craze cardstock: 4" x 5.25" layer and a scrap to die cut the tall pumpkin

Pumpkin Pie cardstock: a scrap to die cut the smaller pumpkin

Old Olive cardstock: a scrap to die cut the leaf and a very thin strip about 3.5" or so long for the vine

Ink Pads: Cajun Craze, Pumpkin Pie, Old Olive, and Crushed Curry

Sponge Daubers

Metallic Pearls: I used 3 gold ones

Assembly tips: 

To get the multi-colored pumpkin, use your sponge daubers to dab assorted colors of ink directly on the pumpkin stamp. You'll want to use a different dauber for each color ink so you don't mess up your ink pads. Make sure the entire stamp is covered in ink before stamping. You might want to breath on your stamp to help re-moisten the ink before stamping depending how long it takes you to ink your stamp.

To curl the vine, rub the Old Olive strip along the edge of your table to break up the fibers. Then roll it around the pointy tip or stylus tip of your Take Your Pick tool. Arrange it to your liking so that one end is under the multi-colored pumpkin and the other is under the leaf. Depending how your vine lays, you may need a little adhesive to hold it down in the middle, too.

I popped up both the leaf and the multi-colored pumpkin.

Thank you for stopping by my blog. I hope you like today's card and it inspires you to get creative.

Thursday, May 20, 2021

Dragonfly Garden Trifold Card

 Hi Stampers! Today I have a trifold card made with the Dragonfly Garden stamp set. I also used the Dragonflies Punch. These two items are available as a bundle.

After stamping the flowers in Garden Green, I colored them with  Garden Green and Daffodil Delight Stampin' Write markers. Then I stamped and punched the dragonflies with Memento Black ink on Calypso Coral cardstock. They were popped up with Stampin' Dimensionals. The Basic Rhinestones add a little sparkle.


There are different ways to fold a trifold card. I chose to fold the right panel in and then fold the left panel on top. That way when you open it, it looks like this:


This is what it looks like when it is open all the way. As you can see, I added some Daffodil Delight dragonflies in addition to the Calypso Coral ones. Tip for the small dragonflies: This set doesn't have a small dragonfly stamp, so I stamped the large dragonfly and then lined the punch up on it so I got some of the head and body, which also filled in the wings.


Because of the way I finished the inside panels that weren't the center panel, I decided that it would look nice if I did the back of the card, too.

Basic Directions:

1. Score 12" x 5.5" piece of Garden Green cardstock at 4" and 8".

2. Using your score lines as a guide, fold the right panel in, lining it up just inside the 4" score line. Then fold the left panel over to the edge of the card. Use your bone folder to get crisp folds. This will give you a 4" x 5.5" card.

3. Complete the 4 Garden Green panels next. Stamp the flowers in Garden Green and then adhere punched out dragonflies as shown in the pictures. I recommend not popping any of these up as it will make the card not close as nicely.

4. Adhere a 3.75" x 5.25" layer of Daffodil Delight cardstock on the front panel of the card.

4. Stamp flowers on 3.5" x 5" piece of Basic White cardstock. If I make this card again, I'll move the stamp on the right down a little bit so the top flower isn't as covered by the dragonfly. Add punched dragonflies with Stampin' Dimensionals and then add Basic Rhinestones. Adhere this layer on top of the Daffodil Delight layer.

5. For the inside center panel, stamp a 3.75" x 5.25" piece of Basic White cardstock as shown in the picture above. If you decide to change it up a bit, remember that this is where you will write your message, so be sure to leave room for that. Adhere with Stampin' Seal.

I hope you'll give this card a try. It's a fun way to give a little extra something to a card without having to master a bunch of cuts and folds. Plus, it gives more room to stamp! If you have any questions about the directions or anything else stamping related, leave me a comment and I'll get back to you.


Sunday, February 28, 2021

NC SU Demos Blog Hop - Shake, Rattle & Roll


 Hi Stampers! Welcome to the February NC SU Demos blog hop where the theme is Shake, Rattle & Roll. We will all be sharing projects that have some sort of movement. I'm sure you'll enjoy seeing the variety of projects in this month's blog hop. If you are following through the hop, you probably just came from Joanne's blog. Wasn't her project fantastic? After you finish reading my post, please leave a comment, and then hit the next blog button to go the next blog in the hop which will be Tina.


Today I have a shaker card to share with you, but it's not the usual type you might be used to. This one uses one of our clear envelopes to create the area for the sequins. I also used the Whale Done bundle, Whale of a Time DSP, and some ribbon.


The Whale of a Time Designer Series Paper (DSP) is so beautiful I wanted to highlight as much of it as I could on each card I made with it. Many of the sheets include really cool looking scenes like the piece used on this card. Tip: Be sure when cutting these scenery pieces that you select the area you want before cutting. In other words, if you want a 4" piece like on this card, don't just lop off 2" from the edge. After you select the area you want, then cut. It might turn out you really do just need to take off 2", but you might need to cut 1" from each side - or some other variation. You can always use the scraps on another project. FYI: the sequins I used are some retired ones I had here when I decided to make the project. It was kind of a pain because I had to pick out colors that didn't coordinate. The Whale of a Time Sequins are the way to go. There's even mini shell shaped ones! One of these days I will learn to just order all the fun embellishments when I order the bundle.

To make the shaker part of the card, all I did was slide my 4" x 5.25" piece of DSP into a clear envelope and slide it down into the corner. I added some sequins and then folded the envelope over as far as a could and sealed it. Then I folded over the side that was wider than the DSP and adhered it on the back with Stampin' Seal+ so that the DSP and sequins were wrapped by the envelope. Tips: 1) You want your envelope tight enough so that the sequins don't end up shaking around to the back of the card but you want just a little slack for the sequins to have room to move. 2) You may have some issues with static. I gently rubbed my Embossing Buddy inside the envelope before adding the DSP and sequins. If you do this, be careful not to get creases in your envelope. I still had some static, but I found that after the card sat for a while the static dissipated and the sequins could move.

After the shaker part was done I attached it to the card base with Stampin' Seal+. I used Granny Apple Green for the card base because it's bright and cheery and really pulls out some of the colors in the DSP.

The whale was stamped with Basic Gray and then punched out. The sentiment is stamped with Calypso Coral and I sponged the edge of the square with Granny Apply Green ink. The ribbon was just folded over back and forth before putting the sentiment over it with Stampin' Dimensionals to pop it up. I like how it turned out looking like a bow. The ribbon is a former Sale-a-bration (SAB) choice but you could find a current current to substitute. But see, that's why you want to stock up on SAB items when you can get them. They are only available that short time but have uses long after SAB ends. Speaking of which, this is the last day to get in on the current SAB offerings. Free item with each $50 purchase (before shipping and tax). Other freebies for orders over $300 and joining Stampin' Up! If you don't already have a demonstrator, please select me as your demonstrator when you check out. Or if you'd like to join, I'd love to have you on my team. Check them out here. This link will open a new window so you can still come back and finish the blog hop.


Here's how I finished off the inside. Happy Birthday is from the Happy Thoughts stamp set.


I hope you enjoyed my post and will be inspired to try one of these simple shaker cards. Now it's time to head to Tina's blog and see the terrific movement project she has for you.


This month's participants:

Friday, February 12, 2021

Another Friends Are Like Seashells Card

 Here's another card featuring Friends Are Like Seashells. 


This might look like a simple card, but look closer. There are some details here that add depth and visual interest to the card. The Crumb Cake layer is stamped with the little dot stamp to make it look more like sand. The shells are die cut with the Seaside Seashells dies and stamped. The die I used is one big die with all the shells connected. I trimmed them apart so I could arrange them how I like. I could have fussy cut them, but this is quicker. Plus, now I have all the seaweed that I cut off to use on a different project. The Bermuda Bay shell is embossed with the Seashells embossing folder to make it a focal point. I used Stampin' Dimensionals to pop up the Bermuda Bay shell and parts of other shells while leaving some shells flat so that it looked more like a pile of shells.

Supplies:

Stamps: Friends Are Like Seashells
Dies: Seaside Seashells
Embossing Folder: Seashells  
Cardstock: Basic White, Bermuda Bay, Crumb Cake
Ink colors: Bermuda Bay, Flirty Flamingo, Calypso Coral, So Saffron, Balmy Blue, and Crumb Cake

Thursday, February 11, 2021

Die Cut Friends Are Like Seashells Card

The Seaside Seashells die set has one large die and several smaller ones. This card was made with the large die from that set and the Friends Are Like Seashells stamp set. These two items are available individually or as a bundle.  When you buy a bundle, you get a 10% discount versus buying the products individually. 


I ran the die with Basic White cardstock through the Stampin' Cut & Emboss Machine. Then I individually stamped the shells in Bermuda Bay, Calypso Coral, So Saffron, Balmy Blue, and Flirty Flamingo. Because the stamps are photopolymer, it was easy to see where to place them. Next I used a sponge dauber to sponge the seaweed with Mint Macaron and I cut out some of the extra white connector parts between the shells. I mounted the die cut on a layer of Pacific Point cardstock and then on a Basic White card base. Rhinestone Basic Jewels add a little bling.

I hope you enjoyed today's card. I'll have another card made with this bundle on tomorrow's post.

Wednesday, February 10, 2021

Friends Are Like Seashells Simple Stamping Card

Recently I was part of an online Open House where a half dozen demonstrators got together and showed off different products. I highlighted the the Friends Are Like Seashells Bundle and Seashells Embossing Folder. My goal was to show how the items can be used separately and together. Over the next several posts I'll share those projects here.


This is a #SimpleStamping Card using only stamps, ink, and cardstock. This would make a perfect birthday card for a special friend since it says, "Friends are like seashells...you collect them along the way." You could use it for other occasions or even just because, but I usually think of birthdays first.

Shell Colors: Petal Pink, So Saffron, Pool Party, and Balmy Blue. Dot Color: Mint Macaron. Cardstock: Petal Pink, Pool Party, and Basic White.

Thanks for stopping by my blog. Be sure to check back for other projects made with this great set and coordinating items.

LinkWithin

Related Posts Plugin for WordPress, Blogger...