Saturday, May 21, 2011

Sense of Time Tri-fold Shutter Card

I needed an extra special card for a big birthday today.   I chose Sense of Time as the main stamp set.  I changed the tri-fold shutter card a little bit by making the front solid.

Here's the card standing up -- notice how the folds alternate between valley and mountain folds and how the middle fold is opposite of the top and bottom where they are aligned. 


I used More Mustard, Always Artichoke and Really Rust on this card, along with the retired Juntos Designer Series Paper.  I used my aqua pen and watercolor crayons to give the clock an antiqued look.  The following photo shows the card closed.

This card is loaded with embellishments.  I used Pewter Hodgepodge Hardware, circle brads, silver brads and twill tape on the front and Always Artichoke brads in the middle of the card.  Assorted punches were also used -- several circles, the ticket corner punch and the blossom bouquet triple layer punch (the flames on the candles).

Birthday Greetings (on the twill tape) came from On Your Birthday.  Make a Wish came from Mini Mates and The More Candles the Bigger the Wish stamp is from Whimsical Words.  The 5 and the 0 came from Alphadot Numbers.  But, you could use any small stamp in those spots.  All of the other stamps are from Sense of Time.

Here is the card laid flat so you can see each panel fully.


Thanks for looking!

Friday, May 20, 2011

Fifth Avenue Florals with Melon Mambo Embossing Powder

The new Melon Mambo embossing powder is so cool!  It gives fantastic coverage.  Click here to see how great it shows up on dark cardstock.  I can't wait to try the other colors!

The flowers, from the set Fifth Avenue Florals, were stamped in VersaMark, then heat embossed with the Melon Mambo embossing powder. I used my aqua pen and ink to watercolor the flowers. The sentiment is from Simply Said. The layer along the bottom was punched with the Dotted Scallop Ribbon border punch and layered on a strip of Melon Mambo cardstock.

Tuesday, May 17, 2011

I finally did it!

I've been thinking for some time about getting my own Demonstrator Business Web Site (DBWS).  Well, I finally did it!  It will take me some time to update everything, but I've filled in some basics and the site is ready to go!

What does this mean for you?  You can now order online 24/7.  There's no need to go through me, just go to my DBWS, set up an account (first time only) and order to your heart's content.  Just please make sure you are on my site when you order :)   My name and info will be in the upper right corner of the page.


You must go through my site if you want to order digital content (not My Digital Studio itself, but any additional digital downloads).  This is also the place to order Clearance merchandise.  Did you know there's great savings on the Clearance Rack, including Designer Series Paper for only $3.49 and ribbon as low as $1.99?  Check it out by clicking on the link to my website and choosing SHOP NOW; then on the left side choose Clearance Rack.

If you have any questions about shopping online or my new DBWS, just ask.  I'm still here to help whenever you need it.  Remember, just make sure my name is in the upper righthand corner as you shop (thanks!).

For any other items, of course you can contact me directly and I'll be happy to place your order for you (just like we do now).  It's just that now you don't have to wait.  You can do it all yourself if you want.  Whatever works for you!

Also, if your order is $150 or more (before shipping and tax), you earn Stampin' Rewards (basically hostess benefits by another name since you haven't actually "hosted" anything).  That's  a minimum of $15 in free merchandise, plus a free hostess set.  Actual amount of free merchandise and hostess set(s) will depend upon the size of the order.

I'm excited about my new site!  Even if you aren't ready to order anything, check it out and let me know what you think.  Even though I'm still personalizing it, there are already lots of project ideas, information about current promotions and more.

Monday, May 16, 2011

Doily Triple Layer Punch

I layered the Doily triple layer punch in different combinations and then put them randomly on a layer of Whisper White cardstock.  Then I ran that piece through the Square Lattice embossing folder.  I liked it so much that I added some Pretty in Pink satin ribbon, attached it to a Bashful Blue base and called it done.

Simple and pretty!


Saturday, May 14, 2011

On The Green Easel Card

We made this card at the Masculine/Father's Day class on Tuesday.  If you missed it, I'm offering the class again on Sat., May 21.   Contact  me to register.  Hope you can make it!!

The stamp is On the Green, an a la carte stamp.  The golf ball was dimpled by running it through the polka dot embossing folder and then using it upside down.  The tee was punched with the Blossom Petals Punch.  I used a small grommet (retired) to make the hole for the flag, but in the class I suggested that a small black circle woud work well.  The ladies seemed to like that suggestion.


The grass is made with a strip of designer series paper.  I cut into the edge of one side, trying to make it jagged, and then folded up that side.  The golf club shafts are made with a thin strip of Basic Gray.  The club heads are made with the word window punch.


Sorry for the change in lighting in the bottom picture from the other two.  I took the photo in a different location.  It seems to look a little yellowish, but aside from that, this is what the card looks like closed.


Friday, May 13, 2011

Open Sea Globe box

This box is made with the Box #2 die.  I wanted a masculine way to give a gift card (it fits in at an angle) and this did the trick.  I realized after I made it that had I made the base Naturals White instead of Sahara Sand, it would have coordinated with the card posted here.  I'll keep that in mind when I start getting Father's Day gifts around.

And yes, the sentiment is mounted on the box straight.  It's just my photography that's crooked.


This box was super easy to make, thanks to the Big Shot and box #2 die!  I stamped the resulting die cut all over with the globe from Open Sea.  After assembling the box, basically folding it on the score lines and then adding Sticky Strip to one little flap, I used Stampin' Dimensionals to mount the sentiment from Word Play.  That phrase pairs so nicely with the globe stamp!

I angled the edges of the flap and then tucked  it under the top of the mounted sentiment.  I used some brads for decoration and wrapped the Early Espresso/White baker's twine around the box a couple of times and tied it the ends together.  Like I said -- easy!

Thursday, May 12, 2011

Sunny Fun Ice Cream Card

Another card using the Summer Mini catalog stamp set Sunny Fun.  This time I used the ice cream stamp.  I used my Aqua Painter and Classic Ink to color the treats.  The Real Red layer is offset a little just to give the card some visual interest.  The ribbon is Whisper White 1/4" grosgrain.


Wednesday, May 11, 2011

Project Give Thanks Cards

Last night I had the opportunity to make cards with our United Methodist Women group for Project Give Thanks.  You can learn more about the project here:


We made these cards so that we can start supplying a local cancer center.  There are over 60 cards here and these are just the ones I designed and prepped.  Another woman from our church also prepared for the evening and total we made about 100 cards and over 40 bookmarks (to put in the cards).  Great job ladies!

Next Wednesday morning, I will be doing this again with our UMW morning circle.  If you are in the Garner/Raleigh/Southern Wake County area and would like to help with this project, we'd love to have you.  E-mail me and I will gladly send directions (or an address if you want to mail cards you've already made).


I used an assortment of supplies on the above cards, some retired and some current, most of it Stampin' Up (the cream colored base on the embossed card is the only thing that isn't SU).  I tried to keep the cards simple since we were making so many of them and also because I didn't want to overwhelm anyone who might be new to card making.

The top card is Crushed Curry.  The flower is made with the Blossom Petals Punch and the sentiment is from Because I Care.  Next to it I used the Elegant Bouquet embossing folder with a sentiment from Kind and Caring Thoughts.  The last one in the top row uses the Butterfly embosslit.  The stamp set is from last year's Sale-a-bration.

The card on the bottom left uses the set Botanical Blooms and the thank you from Because I Care.  Do you know where the Certainly Celery and Pink scalloped layers came from?  The Princess Pary Kit!  We'll make more cards using elements from this kit on Wednesday morning.

The card in the middle bottom uses Sunny Fun and Word Play (which is 30% off this month -- contact me if you'd like to order it).  The one next to it uses Engraved Greetings and Punch Potpourri (it's hard to see, but it's in the upper right corner).  The 1/4" Whisper White grosgrain ribbon also came from the Princess Party Kit, which is available on the Clearance Rack.

Monday, May 9, 2011

My First Ever Easel Card

I have wanted to make one of these cards for a long time.  I just needed to sit down and figure out how to do it.  Turns out it was really easy.  I used the tutorial from Splitcoast Stampers: http://www.splitcoaststampers.com/resources/tutorials/easelcard/

Come to my Masculine/Father's Day card class on Thursday morning (or on Saturday, May 21) to learn how to make one of these cool cards.  This is not the card we will make Thursday.  The one we will make will probably use On The Green, but I'm still designing it so who knows what might happen.

Card standing up:


Even though once I had the card finished I realized it actually is pretty easy, I did learn some things along the way. First, always pay attention to the directions. Don't skim them and think you know what you're doing :) I ended up gluing the flap down to the wrong part and then had to fix it. Second, while the corduroy button looks very cute holding the card up, it leaves a bump when the card is closed. Next time I will use something thinner to help the card stand.

Closed:


Inside:


Go ahead.  Try your own easel card.  You'll be glad you did!

Sunday, May 8, 2011

Flower Garden Embossing Folder

Happy Mother's Day to all the mothers out there!  I myself am very blessed to have a wonderful mother and to be the mother of two fantastic kids!

I have three different cards to show you today.  Each uses the Flower Garden Embossing Folder.  I used the Melon Mambo embossing powder for the thank you on the top two cards.  It just made the words pop a little more.  The thank you doesn't show up as much on the Bermuda Bay in the photo of the top card, but it does in real life (thanks to the embossing powder).


 In case you're wondering why they are all thank yous, it's because they are going to a local cancer center. The patients can use these cards to thank people who have helped them during their battle against cancer. If you are local to the Raleigh/Garner NC area, please join us Tuesday night to make cards for this great cause. If you aren't local, you can still participate by sending donations to help fill our basket.  Contact me (see header for e-mail) to get directions to my church to make cards on May 10 or to get the address to mail donations (cards, supplies or money to buy supplies).  This will be an ongoing project, so even if  you see this after May 10, contact me if you'd like to be a part of it.


We are making these cards as part of Project Give Thanks, which was started recently by cancer survivor Sonja Knaisch.  Her blog is here:  http://projectgivethanks.wordpress.com/home/


The thank you in the top two cards is from Because I Care.  The bottom one is from Teeny Tiny Wishes.

Saturday, May 7, 2011

Melon Mambo Embossing Powder - Wow!

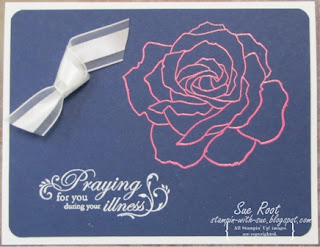
I tried the new Melon Mambo embossing powder and it's fantastic!  Look at how well the rose from Fifth Avenue Florals shows up on the Night of Navy cardstock.  The sentiment is from Wellness Wishes and is embossed with white embossing powder.  The ribbon is 5/8" Whisper White Organza Ribbon.


Thursday, May 5, 2011

Travel Log - Scrapbook Pages

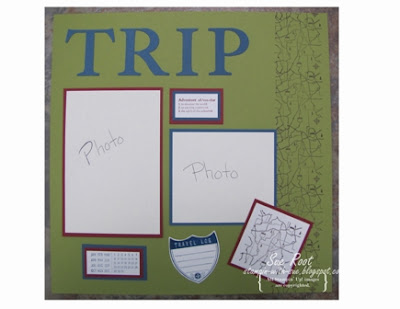
When I first saw the stamp set Travel Log, I thought it would be perfect for scrapbooking.  I was right.  I created this two page, 12 x 12 layout.  Apparently I need to go on a trip, though, because I didn't have any photos for these pages.  So, I just put a piece of paper where each photo should go to give you an idea of what it will look like finished. 


Here is each page separately to try to let you see a few more of the details.  The rectangle on the left is for you to list your Itinerary.  The travel log highway sign has lines so you can do a small bit of journaling.  The border on each page is made using the map stamp over and over.  I connected the lines on the maps using a matching color Stampin' Write marker.


If you need even more room for journaling, you can use the area where I show the 4" x 4 1/4" photo.  Just add a piece of Naturals White cardstock instead of a photo.  You can add lines to the cardstock using the Dotted Lines jumbo wheel to make your journaling easier.


Supplies:

Cardstock:  Naturals White, Not Quite Navy, Cherry Cobbler, Old Olive
Ink:   Not Quite Navy, Cherry Cobbler, Soft Suede
Stamps:  Travel Log
Accessories:  Serif Essentials Alphabet dies, Big Shot

Wednesday, May 4, 2011

Sunny Fun

This card uses the stamp set Sunny Fun and the new Blossom Bouquet Triple Layer Punch from the Summer Mini Catalog.  The new triple layer punches are very cool!  Each punch will punch 3 different ways and then you can layer them in varying combinations.  I actually offset these two punched pieces so you could see more yellow.  But you could line them up so the yellow just shows through the center of the Tangerine Tango petals.  The background was stamped with Itty Bitty Backgrounds to simulate the look of sand.  The Designer Series Paper is Pacific Point from the Patterns Paper Stack - Bold.

Make this card, see what you can do with the new triple layer punches, and see samples using new products from the Summer Mini Catalog at my Open House on Saturday morning.  Send me an e-mail for more information or to let me know you're coming.

Tuesday, May 3, 2011

May Card Kit

The Card Kit of the Month Program – May 2011

Featured Set: “Countryside”
Featured Accessory: Vintage Trinkets


Card Kits are the Stamping Classes that come right to your door! You’ll receive the supplies to create SIX of EACH design shown here – that means all of the consumable supplies that you need to create 12 cards total. You will also receive 2 additional full color photographs of “alternative” cards that you can make with the combined contents of the kit! In addition, you’ll receive detailed, step-by-step instructions on how to complete each of the 4 designs. This month’s card kit items are listed below, and the price of the Card Kit is just $20 – that’s less than $1.70 per card!!

Card Kit Order Deadline is May 15th. You will receive your kits at the end of the month.

Special Offer for May! Purchase the Card Kit and receive the, featured stamp set “Countryside” and the Featured Accessory, “Vintage Trinkets” at 20% off!

The Card Kit ($20) Includes:

 Cut Cardstock & Watercolor Paper Pieces
 Cut Hemp Pieces
 12 – Very Vanilla Medium Envelopes
 Step by Step Instructions to complete 4 different card designs using the kit pieces

Add-On Products:

 Jet Black StazOn Ink ($7.95)
 Baja Breeze Stampin’ Marker ($3.50)
 Cherry Cobbler Stampin’ Marker ($3.50)
 Old Olive Stampin’ Write Marker ($3.50)
 More Mustard Stampin’ Marker ($3.50)
 2 ½” Circle Punch ($16.95)
 Aqua Painter ($16.95)
 Corner Rounder Punch ($5.95)
 Countryside Stamp Set: Wood - ($22.95) $18.36, Clear - ($16.95) $13.56 with the purchase of the Card Kit.
 Vintage Trinkets ($5.95) $4.76 with the purchase of the Card Kit.

Other Optional Purchases:

 Stampin’ Dimensionals ($3.95)
 SNAIL Adhesive ($6.95)
 Bone Folder ($6.95)
 Paper Snips ($9.95)
 Mat Pack ($9.95)
 Paper Piercer ($3.50)

Contact me today to order your Card Kit Today!

Sunday, May 1, 2011

Summer Mini Catalog & Nat'l Scrapbooking Promotion Start Today! Plus a Sunny Fun Card

UPDATED LOOK TO MY BLOG:  Let me start by pointing out that I've changed the look of my blog a little bit.  Notice that along the left side of the blog are several icons.  There are icons for current promotions and current catalogs.  Just click on the icon that matches what you want and a new window will open with the information.  The widgets to do this were very generously provided by another Stampin' Up demonstrator (who also has web design business), Amy Celona.  Thanks, Amy!

The spot to sign up for e-mail updates has moved to the upper right hand side of the blog.

The Summer Mini catalog is now available for ordering.  You can download it by clicking on the Summer Mini icon or by clicking here.

I love the way Stampin' Up digitized this catalog.  You can actually look at it page by page.  When you click on the arrow it flips to a new page.  It makes it so easy to browse through!  Here's a tip:  On the bottom of the page is a tool bar.  If you click on the square with an arrow in each corner it will use the full screen so that the catalog is bigger.

Oh my gosh!  I was just playing with it so I could give you some tips (like when you are done with full screen, just hit the same square to disable full screen and you'll get all of your regular stuff back up at the top of your page) and I discovered that you can search the catalog.  Then when the results come up you can click on what you want and it will take you right to that page.

(Okay all of you techie people out there:  quit laughing now.)

Anyhow, check out the new Summer Mini Catalog because as cool as I think the presentation is, what's inside is even better!

National Scrapbooking Month Promotion:  Save 30% on select stamp sets, digital download bundles and professional print products.  See the Promotions page and click on the top icon on the left side to get more info.

Strength and Hope Campaign:  Purchase the beautiful stamp set Strength and Hope before August 31, 2011 and Stampin' Up will donate $2 to The Breast Cancer Research Foundation® (BCRF).  You can click on the Strength and Hope icon for more info.

Other Promotions:  See the Promotions page for more information on these additonal specials that I am offering:  1) bonus item with the purchase of the Define Your Life stamp set or an alphabet set ($43.95 or above); 2) a free stamp set (in addition to all of the free hostess merchadise available) for having a party with 8 or more guests.  These are only available through me, Sue Root.

And to reward you for getting this far, here's a card I made using the new set, Sunny Fun.    Sorry it's a little dark.  The other option was yellowish from the overhead lighting.

I used Whisper White and the following Brights colors: Tempting Turquoise, Real Red, Pumpkin Pie and Daffodil Delight.

LinkWithin

Related Posts Plugin for WordPress, Blogger...