Showing posts with label Holiday Ornaments framelits. Show all posts

Sunday, December 1, 2013

Ornament Keepsakes Circle Thinlits Card

Here's a card made with the Christmas Messages stamp set (on sale through tomorrow for only $14.67), Holiday Ornaments Framelits (on sale through tomorrow for only $18.71), Ornament Keepsakes stamp set, and the Circle Card Thinlits Die.  The Designer Series Paper (DSP) is from the Paper Patterns Stack (I think Subtles, because the DSP looks like Pear Pizzazz - which is just a guess since I don't have the card here, only the digital photo; either way, the packs are available for all color families).

If I was making this again, I would make the ornament 3-d, like I did on this card.
 The Thinlits dies make flip cards - see how the circle "flips" when the card is open?  It makes a unique card with a huge "Wow!" factor.  Believe it or not, this is the same card.  Must be a trick of the lighting that makes the green look so different.
Click here for other projects made with the Holiday Ornaments Framelits.

Although I've used Christmas Messages on tons of cards, apparently I haven't posted any of them yet.  It's a great set!  I especially love the stamp on the circle!

You can order any of the sale items (Holiday Sale, Weekly Deals, and be sure to check back tomorrow for the Cyber Monday Sale) through my Online Store.

Monday, September 9, 2013

TSSC 279 - Ornament Keepsakes

For this week's Techno Stamper Sketch Challenge, I rotated the sketch so it's landscape instead of portrait.  I used ornaments from the Ornament Keepsakes stamp set and cut them out with my Big Shot and Holiday Ornaments Framelits.  The stamps and the framelits are still available on the carryover list (which means they aren't in a catalog, but you can see them online* at the Stampin' Up! website).  The front message and inside sentiment are both from Christmas Messages in the Holiday Catalog.

 Here's how I did the inside:
And here's this week's sketch:
You can see the rest of the design team samples and play along here.  There are some great cards this week, so be sure to check them out, then create your own project and add it by clicking on the link that says "Click here to enter".

*Remember, if you order these products online through me, use hostess code VAAX4KKY to be entered in this month's prize drawing.  Any size order qualifies, but the bigger your order is, the more entries you get.  All orders will be combined to earn hostess dollars, so the bigger the combined total is, the more prizes there are.  Thank you for your business!

Saturday, December 15, 2012

Holiday Frame with 3-D Ornament

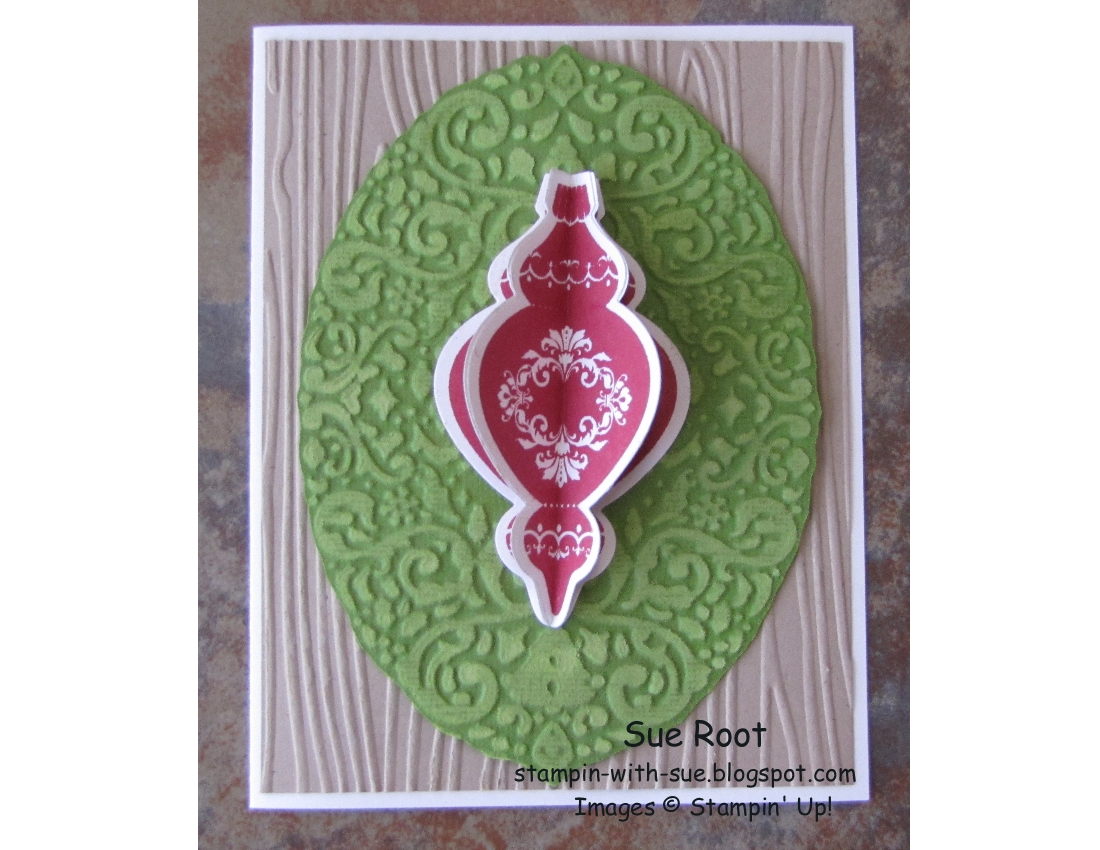
This Christmas card, which we made in a recent class, uses the same process as making a 3-D ornament from stamped and cut images.  But, instead of 6 stamped ornaments, it only takes three since the card only has a half of an ornament on the front.  It was made with the Ornaments Keepsakes stamp set and Holiday Ornaments framelits.  The ornament is layered on a wreath that has been embossed with the  Holiday Frame embossing folder and Big Shot.
 Here is an angled view to show the ornament better.  Bonus: the ornament will lay flat to mail.
Here is another example of this type of card.  This wreath was layered on Crumb Cake card stock embossed with the Woodgrain embossing folder.  I think the wood grain makes it look like the wreath is hanging on a front door.

Friday, October 5, 2012

Big Ornaments

This is another card that we did in the Christmas Stamp-a-Stack.  It uses the big ornaments from the Ornament Keepsakes stamp set and the coordinating Holiday Ornaments Framelits.  The background was done with the Big Shot and the Vintage Wallpaper Embossing Folder.


Tuesday, October 2, 2012

October Card Kit of the Month


 Stamp Set of the Month:
“Ornament Keepsakes”
Accessory of the Month: Gumball Green 3/8” Stitched Satin Ribbon


When you order the October “Stamp Set of the Month” Bundle, you’ll get a kit containing all of the precut card stock pieces needed to make 6 of the cards shown above for FREE! Additionally, you’ll be e-mailed a PDF File that contains step-by-step instructions on how to make the card shown above along with 3 BONUS designs for creative inspiration on other things that can be done with the featured stamp set so you can see its versatility and get the most bang for the buck! Supply Lists are included for the bonus designs.

Want more precut pieces? No problem! When you order the Stamp Set of the Month Bundle, you can order additional quantities of precut cardstock pieces in increments of 6 so that you can make as many as you want to have on hand!

October Stamp Set of the Month WOOD Bundle: $43.90 + Shipping and Tax
(Includes your order for the “Ornament Keepsakes” stamp set in wood mount and 1 spool of Gumball Green 3/8” Stitched Satin Ribbon plus the FREE kit)

 October Stamp Set of the Month CLEAR Bundle: $34.90+ Shipping and Tax
(Includes your order for the “Ornament Keepsakes” stamp set in clear mount and 1 spool of Gumball Green 3/8” Stitched Satin Ribbon plus the FREE kit)

Additional Quantities of the October Kit: $6 + Shipping for every set of 6 cards
You can order the Card Kit for $6 without purchasing the stamp set and accessory.
Shipping only applies if you are not local.
  
Other supplies you’ll want to order: Cherry Cobbler Classic Ink Pad, Illuminate Glimmer Watermark Ink Pad, Holiday Ornaments Framelits Dies (saves time in cutting out ornaments), 1” and 1 3/8” Square Punches, Cherry Cobbler Bakers Twine, Northern Flurry Embossing Folder, Whisper White Envelopes, Paper Snips, SNAIL Adhesive and Stampin’ Dimensionals.

Wednesday, August 22, 2012

Gift Card Holder Instructions

When I posted the Gingerbread Gift Card Holder last week I got a comment asking for directions.  Here's what I came up with.  I wanted to do this on a nice sunny day to get good pictures but decided that wasn't going to happen.  So, sorry about the quality of the pictures, but at least I'm getting this done.  I hope you'll find it helpful.

 Finished Gift Card Holder:

 Use the Simply Scored tool to score a 4 1/4" x 11" piece of cardstock at 3", 5 1/2" and 8"
 The middle fold should be a mountain fold and the two others should be valley folds.  In other words, the middle score line should be folded opposite of the outer two.
 Use Sticky Strip to adhere the middle pieces together.  Only put Sticky Strip on three sides.   Do not put it on the folded edge.  I tried to get a picture of this, but the red Sticky Strip did not show up on the Real Red cardstock.
 Use the Word Window punch to cut two notches along the folded edge of the middle piece (the two pieces that were just stuck together).  Go in less than half the width of the punch or the edges will start curling back.
 Use the 1 1/4" circle punch to cut a half circle in the center of the folded edge of the middle section.  This will join the notches made by the Word Window and make it easier to get the gift card in and out (now you see why I said not to put Sticky Strip along that edge).
 Finish the front of the card.  It needs to be a relatively simple design since the belly band will go over it.  It's basically more of a background.  Here I stamped ornaments from the Ornaments Keepsakes stamp set with the Illuminate Glimmer Stampin' Pad.  I stamped two ornaments from the same set, cut them out with my Big Shot and the Holiday Ornaments framelits and then attached them near the bottom.  I stamped Merry Christmas with Teeny Tiny Wishes, punched it with the Word Window Punch and layered it on a piece punched with the Modern Label Punch.  This was placed where the belly band will go so that it gets covered.  It's there so the card isn't so plain when the belly band is removed.
 Finish the inside.  I randomly stamped an ornament (again from Ornament Keepsakes) on the first three panels.  Then on the last panel I put a layer of Whisper White and stamped a sentiment from More Merry Messages.
 Cut a strip of cardstock (in this case Whisper White) 7" x 1".  Wrap it around the card.  Do not make it too tight because it has to slip on and off the card.   Glue the ends together on the front side.  Cover the seam with a decorative element.  And you're done.  Did you notice the silver top on the ornaments?  I colored them with the Silver Stampin' Dazzle marker.
I hope you'll use these instructions to create your own Gift Card Holder.  If you do, leave a link in the comments so I can go see it.  If you don't have a blog or somewhere else online to post it, e-mail a picture of it to me and I'll post it.  Can't wait to see what you create!

P.S. Don't forget about the Late Night Stampers Treasure Hunt.  Prize is $150 in Stampin' Up merchandise provided by Sherrill Graff.  Updated list of participating demos is here.

LinkWithin

Related Posts Plugin for WordPress, Blogger...