Tuesday, March 29, 2011

Blossom Petals Tulips

I've been having a great time creating with the Build a Blossom stamp set and Blossom Petals Punch.  I have lots to post once I get them photographed.  Today's card is a different take.  I made tulips with the very smallest petal/leaf.  And, although I've looked at lots of ideas, I'm pretty sure these are unique.   At least I haven't seen anything like them posted anywhere.

I used the Framed Tulips embossing folder around the edge, an oval punch with the ends cut off for the vase and, as I said, the smallest petal/leaf from the Blossoms Petal Punch for the tulips.  The stems and leaves were hand-drawn using my Garden Green Stampin' Write marker.  I used the tulips from A Flower for All Seasons to get an idea what they should like.


The tulips remind me of my college days at Hope College in Holland, MI.  In the Spring, there were tulips everywhere!  Holland even has a tulip fesival every year in early May.

Sunday, March 27, 2011

Game Spinner Hands with Three Little Words

Here's another fun card using the Game Spinner Hands.  How can it not be fun when it's interactive like this?  The stamp set is Three Little Words and it's available free during Sale-a-Bration with a minimum purchase.


Saturday, March 26, 2011

Engraved Greetings

This is the first card I made using my new Framed Tulips Embossing Folder and also my new stamp set, Engraved Greetings, which I got for free thanks to Sale-a-Bration.  I didn't even make the outside border first.  As soon as I pulled the embossing folder out of the shipping box, I envisioned framing one of the images from Engraved Greetings.  I cut out the corners so I could put the brads there.  Plus, I hadn't anticipated that the corners would be messy when I was done.  I know now how to make smaller frames without the messy corners.  I just didn't think it through in my haste to try my new "toy."


Happy stampin!  Sue

Tuesday, March 22, 2011

Build a Blossom

I have two similar cards for you today, both of which use the Build a Blossom stamp set and Blossom Petals Punch.    The card on the left uses a stamp from Itty Bitty Bits for the background.  I also inked the edge of the layer with Bashful Blue before adhering it to the card base.  On the right is a one layer card and it uses the Fast Flower Wheel.  So, both have a small flower background, but each is done a different way.

Also, on the Bashful Blue card I stamped the Build a Blossom flower petals and leaves on Whisper White.  On the Melon Mambo card I used the same color ink and card stock for the petals and leaves.  Two different looks, both great.  That's what's so fun about this stamp set and punch -- you can get so many different looks.  Just because I was curious, I stamped the Melon Mambo petals on textured cardstock.


I still have room in the Build a Blossom classes I'm offering next week on Tuesday night (3/29) and Wednesday morning (3/30). 
See Classes for details on this and other class offerings.

Sunday, March 20, 2011

Easter Treats

Here are two fun Easter treats that would be great for an Easter basket or to give to teachers or someone else special.  The orange one holds a mini candy bar.  The one on the right is called a sour cream container.  Just to give you an idea of the size, there are 6 chocolate kisses inside it.


We will be making these two treats in the Easter class on Saturday (some color choice will be available for the sour cream container).

Saturday, March 19, 2011

Punch Bunch Baby Card

This card uses the Stampin' Up set Punch Bunch, which you can get for FREE until March 31 with a $50 order.  It's a great set with five different stamps, three of which I've used in posted cards (I've used the others -- maybe you'll see those posted, too).


The other stamp is from Congrats, a Sale-a-bration set from a couple of years ago (so I got it for FREE, too).  I have a few extra sets available if you'd like to own one.  Contact me to get Congrats (you can get it for free if you host a qualifying party) or to place an order so you can get Punch Bunch for free.  I'd love to help  you out with your stamping needs.

Friday, March 18, 2011

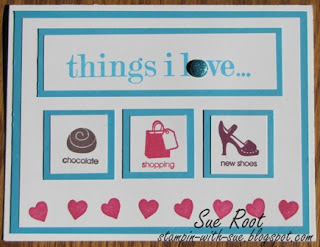
Things I Love with Glimmer Brads

Today's card uses a glimmer brad in place of the "o" in love to add a little pizzazz.  It fits perfectly.  The darker part on the "l" is only a shadow -- it's not as obvious in person.

After reading the things I love, you open the card and it says, "but most of all,...YOU."  What a nice sentiment to send to a loved one.


Thursday, March 17, 2011

Things I Love with Game Spinner Hands

The new game spinner hands are so much fun (and they're only $3.95 for 12 of them)!  I like the stamps that coordinate with them, but I wanted to try something different.  So I paired them with the Stampin' Up set Things I Love.  I've been using this set a lot lately.  I'll post another card using it tomorrow.

Because I wanted four options for the spinner to land on, I used the set Morning Cup to get the fourth choice.  I do love coffee, but I chose it because the size was about right.  I used the Signo white gel pen to make the divider lines.


Then when you open the card, it says:


You could use that stamp on the front for the fourth choice, but since it's "most of all" I liked it in the inside.

Hope you have a wonderful day!  Thanks for checking out my blog.

Sunday, March 13, 2011

Punch Bunch - For You Flower

Here's another card using the Sale-a-Bration set Punch Bunch.  This set is only available through the end of this month and only with a $50 (before shipping and tax) order -- but then it's FREE!


Saturday, March 12, 2011

Punch Bunch Birthday

My first ever Mystery Hostess Party went really well.  Everyone had a lot of fun.  I did a demonstration using the Baskets and Blooms die for the Big Shot, then everyone made a birthday card using the Sale-a-Bration stamp set Punch Bunch.  On top of that, everyone got a prize and one person won a second prize!

Here's the card we made:

Edit 4/5/11.  The card with the rhinestones is the one we made at my event.  For some reason I originally posted my first card, which I decided needed jazzed up a little (hence the addition of the rhinestones).  I've left the original card in this post because the colors in the photo are closer to real life (but still kinda off -- that background is real red) and also so that you can see how much something simple like the addition of a few rhinestones really adds to the impact of a card.


Keep checking my Classes page because I plan to do this again.  Maybe you can join us.

Thursday, March 10, 2011

A Flower For All Seasons -- from the Spring Card Class

We had a lot of fun at the Spring Card class this morning.  This is one of the cards we made, using the Stampin' Up set A Flower For All Seasons.  You can get this set for free now through March 31, 2011 with a $50 order (before shipping and tax).

It's too late for this class, but I'm having a Mystery Hostess Party on Saturday morning (3/12) and a Build a Blossom class on 3/24.  I'd love to have you join us.  See the Classes page for details, then contact me to RSVP.

For a variation, some of the ladies this morning tied a half knot in the ribbon before adhering to the card.  It gave the card a little more visual interest and depth.  I did not want the extra bulk on my card because I plan to mail it with other stuff in the envelope and I didn't want it to get too fat.  So I just left my ribbon flat, which I also think is cute.  That's another great thing about homemade cards -- you can make them how you want them!


Wondering what else we did this morning?  I posted both of those cards previously -- a bendy fold card and a St. Patrick's Day card.

Have a blessed day!  Sue

Tuesday, March 8, 2011

Build a Blossom smaller flowers

Here's an example of yet another flower that you can make with the Stampin' Up stamp set Build a Blossom and the coordinating Blossom Petals Punch.


I didn't have any wide Daffodil Delight ribbon on hand, so I substituted this retired ribbon.  If I had stamped the flower petals on an in color I could have used the 1/2" stitched poly ribbon (which I have in all the in colors).  Guess there's a lesson there in planning out your card before you begin stamping :)

I can tell I'm going to have to make this card again in different colors because I'm imagining how cute it would be using the in colors.  In the meantime, you can enjoy this card and CASE it using 5/8" grosgrain ribbon.  Or, try your own color combination.  If you do, I'd love to see your results.

Sunday, March 6, 2011

Easter Blossoms Card Kit

Card Kit of the Month – March 2011

Featured Set: “Easter Blossoms”
 Featured Accessory: Vintage Flower Adornments


Card Kits are the Stamping Classes that come right to your door! You’ll receive the supplies to create SIX of EACH design shown here – that means all of the consumable supplies that you need to create 12 cards total. You will also receive 2 additional full color photographs of “alternative” cards that you can make with the combined contents of the kit! In addition, you’ll receive detailed, step-by-step instructions on how to complete each of the 4 designs. This month’s card kit items are listed below, and the price of the Card Kit is just $20 – that’s less than $1.70 per card!!

Card Kit Order Deadline is March 15th. You will receive your kits at the end of the month.

Special Offer for March! Purchase the Card Kit and receive the featured stamp set “Easter Blossoms” and the Featured Accessory “Vintage Flower Adornments” at 20% off!

The Card Kit ($20) Includes:

* Cut Cardstock Pieces
* Cut Seam Binding Pieces
* 12 – Die Cut Ovals
*12 – Very Vanilla Medium Envelopes
* Step by Step Instructions to complete 4 different card designs using the kit pieces

Add-on Products:

* Baja Breeze Classic Ink ($5.95)
* Early Espresso Classic Ink ($5.95)
*Rose Red Classic Ink ($5.95)
* Stamping Sponge ($3.50)
* Easter Blossoms Stamp Set: Wood - ($25.95) $20.76 Clear - ($1895) $15.16 with the purchase of the Card Kit.
* Vintage Flower Adornments ($5.95) $4.76 with the purchase of the Card Kit.

Other Optional Purchases:

* Stampin’ Dimensionals ($3.95)
* SNAIL Adhesive ($6.95)
* Bone Folder ($6.95)
* Paper Snips ($9.95)
* Mini Glue Dots ($4.95)

Please Note: I am glad to ship kits directly to you! There is a $3.50 shipping charge.

Contact me today to order your Card Kit Today!

Saturday, March 5, 2011

More Build a Blossom

Man, I love the Build a Blossom stamp set.  You can make so many different types of flowers with it.  Look for more posts containing this set and the coordinating Blossom Petals Punch.


Hope you are having a wonderful weekend!

Sue Root, Independent Stampin' Up Demonstrator

Friday, March 4, 2011

Bendy Fold Card

As promised in my last post, here's my version of the bendy card.  This card is so much fun!  I have to thank my friend Corothy, who originally saw this card on the Internet and suggested that we make one in a class.  Speaking of which, due to participant illness the morning Spring Class has been rescheduled for next Thursday, March 10 at 10:00am.  E-mail me (address is in header) or comment on this post if you're able to come. 

The original instructions came from Emma Fewkes.  Go here to see her bendy card and in the upper right of the page you can click to get the tutorial:

http://ladynthestamp.blogspot.com/2011/01/bendy-fold-card.html

Thank you Emma for sharing the instructions to make this unique card! Emma also has some links to other blogs that have posted bendy cards. Patty Bombyck did one using Things I Love. That's a great little set. I'm currently working on a card with that set using the Game Spinner Hands. I'll post it when I'm done.

Now, on to my cards.  This first one is the one we will make in the Spring class next Thursday.  I just got Forest Friends for free (thanks to Sale-a-bration!) and thought it would be perfect for this type of card.  The flowers are from the hostess set Punch Potpourri, which I also got for free.  Host your own workshop (party) before the end of March and you, too, could get these sets for free! 

Here's a top view to give you a better idea of how the card works:


Here's the very first bendy card I made -- very cheerful and Spring-like with the bright colors, flowers and butterlies.


Here's a close up of the phrase on the front, which comes from Simply Said (as did the flowers on the back panel).  Sorry it's a little blurry (it's not on the card, just in my photo), but it says, "a friend is someone who makes it easy."  How true!


These cards will fit in a regular sized envelope -- just take the tabs out of the slots and lay flat.

Reminder: register for the Mystery Hostess party by March 5th to receive an extra ticket for the prize drawing. There will be lots of fun, prizes and stamping. Hope you can join us. Go to the Classes page for details on all of my upcoming events.

Send me photos of the bendy cards you create and I'll post them or add a link in the comments section so others can see your work and maybe get an idea they'd like to try.

Thanks for stopping by my blog today!  Sue Root, Independent Stampin' Up Demonstrator

Tuesday, March 1, 2011

St. Patrick's Day Card

This is one of the cards we will make in the Spring Class on Thursday.  There is still time to register -- either through the e-mail address in the header or by leaving a comment on this post.  We'll also be making a bendy card.  Have you seen those yet?  Very cool.  My next post will show you one.

This card uses Whisper White and Garden Green.  I used the heart to heart punch to make the four leaf clover.  The center is from Build a Blossom.  The phrases are from Teeny Tiny Wishes and Define Your Life (which is full of fun, useful definitions -- great for cards, scrapbooking, inspirational journals...you name it).


I got the inspiration for this card on Stampin' Connection, a website full of ideas and more, that is open only to demonstrators.  Sale-a-bration is a great time to join Stampin' Up.  Contact me today to join!

(The talented demonstrator who shared the original card is Marsha Brooks.  I didn't copy hers exactly, but the layout is the same.)

LinkWithin

Related Posts Plugin for WordPress, Blogger...