Saturday, December 31, 2011

Happiest Birthday Wishes

Do you like free Stampin' Up stuff?  I know, silly question.  Who doesn't like free?  Today's card features two great items that you can get for free if you join my Sale-A-Bration stamp club.  Contact me or see here for more details.  We always have lots of fun in stamp club and would love to have you join us!

The background was made by running the Stripes Textured Impressions Embossing Folder and a piece of Tempting Turquoise cardstock through the Big Shot.  Both stamps come from the hostess set Happiest Birthday Wishes.  The stamp on the ribbon was punched out with the Large Tag Punch and the Real Red layer behind it was punched with the Extra-Large Tag Punch.  I used Real Red and Delightful Daffodil Stampin' Write markers to add as many candles as I could because on the inside I stamped the saying, "the more candles the bigger the wish!" from the previous S-A-B set Whimsical Words.  Each year Stampin' Up has wonderful sets that are exclusive to Sale-A-Bration.  This year is no exception.  Make plans to get yours for free -- much better than seeing it used later and wonder why you missed out.

I added a few Basic Rhinestones along the side of the card.  The ribbon is retired, but you could substitute for that -- maybe some 5/8" satin ribbon or a strip of Real Red cardstock stamped in Whisper White ink with Dot, Dot, Dot (or perhaps the dots in Confetti).  Or maybe even a strip of Real Red cardstock punched with the Dotted Scallop Ribbon Border (try it layered on a strip of Whisper White).


So, are you wondering what the free items are?  Well, as part of the Sale-A-Bration stamp club, each member has one turn as hostess.  You could choose Happiest Birthday Wishes and still be able to choose more free hostess merchandise (like maybe the Basic Rhinestones or another hostess set).  The Stripes Embossing Folder is one of the items you can choose for free this year during Sale-A-Bration.  There are four exclusive stamp sets, designer series paper, a ribbon and brads pack, two exclusive CDs full of digital content for My Digital Studio and several items from the Idea Book and Catalog.  Those are some pretty good freebies just for placing a $50 (before shipping and tax) order during the S-A-B period (1/24/12 through 3/31/12).  Whether you join the stamp club or order from my online store, don't let this opportunity pass without earning all the free merchandise you want.

Be sure to check back to see samples made with items from the upcoming Occasions Mini Catalog and the Sale-A-Bration flyer.

Friday, December 30, 2011

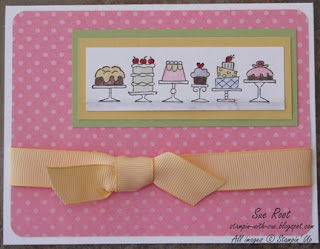
Birthday Bakery Card

I just love the sentiment on the inside of this card.  It says, "if you are what you eat, eat something cute!"  I did the front in pastel colors to try to make it look "cute."  The stamp on the front and the one inside both come from Birthday Bakery, a retired hostess set.  Good news, though!  I have one set available.  You can purchase it or get it for free by hosting a party with at least 8 guests.  Since I only have one set, contact me today to make it yours.

I'm pretty sure the Designer Series Paper is from the Patterns DSP Paper Stack.  I love those and have them in almost every color family.  You get 40 sheets of Stampin' Up's high quality, double sided, Designer Series Paper for only $21.95.  You can get a lot of cards and projects from 40 sheets!  And since the packs are by color family it makes it easy to coordinate the colors.


The ribbon is available on the Clearance Rack, along with a lot of other great values.  You can shop through my Online Store for Clearance Rack and regular priced items.

Don't forget that the Holiday Mini Catalog ends on January 3rd!

Wednesday, December 28, 2011

Hooray! and Thank You!

Over the past several months I have not been as active on my blog or as a demonstrator as I would have liked.  I've mentioned that it's due to health problems, but I don't think I ever went into details.  Well, I was diagnosed with breast cancer over the summer and after a lumpectomy went through chemotherapy.  I am happy to say that I had my last chemo treatment yesterday!  Yeah!  Yippee!  Hooray!

I also want to say thank you to my regular blog readers and my customers (and of course my family, friends, and church family -- not all of which are mutually exclusive -- several of you fall into multiple categories) for sticking by me during this difficult time.  I've been amazed and blessed by the outpouring of prayers, help, meals, support, cards, etc.  I'm hoping to get back to a somewhat normal schedule after the first of the year.

Today's card is in honor of finishing my chemo treatments.

While some of the items are not available, you could easily substitute the Ribbon of Hope stamp for the die cut ribbon and current designer series paper (and matching color cardstock strip in the middle).  The large scallop circle was cut using the  Scallop Circle # 2 die.  The circle under the ribbon was cut using the Circles #2 die.  I really like both those dies because they increase my layering ability.

With all of Stampin' Up's wonderful colors, you can match the ribbon (and, of course, scallop circle and background layer) to whatever type of cancer the person you make the card for is battling.  Then you can coordinate the desinger series paper with the ribbon color.

Thanks for stopping by my blog!

Friday, December 23, 2011

My Digital Studio Christmas Card

If you've put off your Christmas cards until now, you need something you can make fast.  Well, today's card is as quick as you can get.  I made today's card using My Digital Studio (MDS).  MDS comes with many pre-designed cards, some of which are for Christmas.

All I did was opened MDS, selected the type of card I wanted to make, chose Designer Card and then selected this card from all of the pre-designed choices that were available.  I could have added to the front of the card, but I liked it just the way it is.


When making your MDS card you have the option to add personal touches to the other pages of the card.  For the message on the inside of the card you can use one of the provided stamps or you can type in your own message (or a combination of both).  At this point your card is ready to print.  Stampin' Up offers professional print services and the cards from there are extremely nice.  I have a sample if you're local and would like to see how nice they turn out.  But, if you're looking for a card in time for Christmas, you'll have to print it using your printer (which fortunately is another option).

MDS is quick and easy to use.  It took me longer to do this blog post than it did to make the card.  You could further personalize the card by adding photos (maybe on left flap as you open the card).  On the back of the card you could add a snippet that the card was created by you.  And if you don't want to use the pre-designed cards or want to utilize your own creativity, you can design your own card from scratch.  It really is a versatile program.

The card design and stamp images in this post are copyrighted by Stampin' Up.  But if you order your own copy of MDS you can use this card and all of the other myriad stamps, card designs, photo album designs, calendars and more that are included with the program.  You can order yours today through my online store.

Wednesday, December 21, 2011

Quick Last Minute Cards

Here's an idea for those of you who have procrasinated or anyone who has to make a lot of cards in a short amount of time.  Use the Jolly Jingles wheel on the bottom half of the card.  If only doing a card or two, inking the wheel on your ink pad is fine.  But, if you are doing lots of cards or any larger sized project (like a scrapbook page), you should use a Stampin' Around Cartridge with your wheel.  You can get the cartridges in black or uninked (you just add the color you want with a reinker) for Standard or Jumbo wheels (and uninked only for the Builder Wheels).  The cartridge just pops into your Stampin' Around Handle and keeps your wheel inked and stamping until the ink runs low (which is a long time).

Along the top of the card, add any stamp of interest.  I've shown two examples below.  One with a stamp from a retired set (but there is a very similar stamp in Delightful Dozen -- I actually like it better) and the other with stamps from Jolly Bingo Bits and Tags til Christmas.


The inside of the card has a nice sentiment from Many Merry Messages.  I also added the ornament from Jolly Bingo Bits down in the corner.


If you'd like more information about using wheels, Stampin' Up or any other stamping related questions, please feel free to contact me.  You can order the supplies to make these cards by contacting me or through my online store.

Thanks for stopping by my blog.  Sue Root, Independent Stampin' Up Demonstrator

Tuesday, December 20, 2011

Christmas Wreath Card

This wreath was made using the retired Trio Flower Punch, but you could make it with the smallest flower on the Boho Blossoms Punch.  The bow is made with 1/4" grosgrain ribbon.

The card itself was cut with the Big Shot using the Magnetic Movers and Shapers die and the Movers and Shapers Punch Windows.  I love this combo because it allows me to get bigger shapes that coordinate with my punches.  I used the Modern Label Punch and the Word Window to get the layers that show through the opening in the card.  The sentiment is from Teeny Tiny Wishes, which I use tons.
As an added bonus, the piece that was cut from the card front can now be used to on another card layered under a piece punched with the Modern Label Punch.

Hope  you enjoyed today's card.  If you'd like any of the items used on today's card, they can be purchased from my Online Store.


Monday, December 19, 2011

Northern Hearts Christmas Card.

This Christmas card uses a retired set that I really like called Northern Hearts.  It was in last year's Holiday Mini Catalog.  If you didn't get it then, I have an extra set for sale.  Leave a comment or send an e-mail if you'd like it.  The sentiment comes from Many Merry Messages which can be ordered from my online store.


Sunday, December 18, 2011

Word Play Christmas

There's still time to get those Christmas cards done.  Here's another quick one.  I used the Big Shot and the Northern Frost Decorative Strip to cut the snowflakes.  The stamp is from Word Play.


Saturday, December 17, 2011

Loads of Love Christmas Card

Christmas is fast approaching and time is running out for making cards.  With that in mind, here's a quick, card using the tree from Loads of Love and Teeny Tiny Wishes.


Thursday, December 15, 2011

Clearance Rack Blitz

Clearance Rack Blitz:  December 15, 2011-January 5, 2012

Lots of items have been added to the Clearance Rack.  Check them out here.

Cardstock, punches (old body style), Big Shot dies, Designer Series Paper, ribbon, buttons, scrapbook albums and more all at huge savings!

Things to remember:
* Items are only available while supplies last.
* All Clearance Rack sales are final (no refunds or exchanges).
* Qualifying orders earn Stampin' Rewards (orders can include non-clearance items).
* No minimum purchase is required.
* Following the Clearance Rack Blitz sales period, some blitz items may remain in the clearance rack; others may be removed and reappear at an undesignated time in the future.


Wednesday, December 14, 2011

Jolliest Time of the Year Tree

I've been going through some of my old samples and found several cards that I have not previously posted.  So the next few days I'll be posting some of those cards.  Those of you who attend my events may recognize them as cards you've made or seen out on the sample table.

Here are two cards that use the tree from the Jolliest Time of the Year.  They both also use the Oval Scallop Frame die.  The top card uses the frame as it's punched out by the Big Shot.  The bottom card uses the part that was left after the frame was removed (i.e. the red part is what is left; the Very Vanilla scallop frame is actually the card base).

A nice feature of the Oval Scallop Frame die is that you not only get the scallop frame, you get the oval that cuts out of the middle of the frame.  This gives a lot of options for mixing and matching or just using the parts by themselves.


Sunday, December 11, 2011

Bells and Boughs

Here's a quick card I made using Bells and Boughs.  The textured cardstock (the Always Artichoke) adds a little extra something to the card.  I used my aqua painter to color the holly leaves and berries.  The coloring goes really fast that way.


Supply list:

Stamps:  Bells and Boughs
Cardstock:  Very Vanilla, Always Artichoke (textured)
Ink:  Cherry Cobbler, Always Artichoke
Cherry Cobbler Seam Binding Ribbon
Ticket Corner Punch
Aqua Pen

Wednesday, December 7, 2011

My Digital Studio Anniversary Cards

Hi Stamping Friends!  Today is my parents-in-law's anniversary.  I created a card for them using My Digital Studio (MDS).  Actually I created two and let my husband choose which one to send.  It was so easy to do and lots of fun because I could just keep playing with embellishments and designer series paper (dsp) until I found what I liked.  I do that with paper cards, too, but my selection of embellishments and dsp is not nearly as large as the one in MDS (though I have to admit it is pretty big).

MDS comes with tons of pre-designed cards.  That's what I used for the first card.  I didn't find any pre-designed anniversary cards, so I chose a different one (thank you, I think) and then modified it for my use.  That's the nice thing about the pre-designed cards -- you can use them as they are or you can use them as a starting point and change them to suit you.


I designed the second card from scratch.  I liked that I could make the punches and stamps any size I wanted.  A note of warning:  you can make punches larger with no problems, but when making stamps larger it's possible that they will pixilate when printed.  Luckily, MDS gives a warning message if that's a danger.  


The dimensions of the two cards are different.  The top one is 6 x 6 and the bottom one is 5 x 7.  MDS offers several sizes for a traditional greeting card and also for tri-fold cards, postcards and tags.  In addition, you can use MDS to create photo books and pages (digital scrapbooking), calendars (great Christmas idea!), swatchbooks, and journals.  There are also multiple output options.

If you'd like more information about MDS check out this website:


I'd also be happy to talk to you about MDS.  Contact me by leaving a comment or at the e-mail address in the header.

Hope you enjoyed these samples and I hope my in-laws are having a wonderful anniversary.

Friday, December 2, 2011

Zoo Review Cards

These two cards were made by my very talented daughter using the stamp set Zoo Review.

The penguin card uses Basic Black, Tempting Turquoise and Whisper White cardstock and Basic Black ink.  The Tempting Turquoise and Real Red Brads are from the Brights Brads collection and the big brads along the right are Clear Rhinestone Brads.
The giraffe card uses Soft Suede, More Mustard and Whisper White cardstock, Basic Black ink and Basic Pearls.  I'm not sure of the ribbon, but it's possibly the 3/8" Tafetta Ribbon.


Sunday, November 27, 2011

3-d Stocking Gift Holder

I'm having so much fun with this new Holiday Stocking Die.  Here is a 3-d stocking I made.  Great to fill with any number of small items.  What a cute way to package a small gift.

You could decorate the stocking with holly berries like in this post
or write the recipient's name on the white cuff.  Or you could leave it like it is if you like a simpler look.


Here is the inside of the stocking.  Basically I took a piece of matching card stock, used my Simply Scored tool to score the bottom and sides and attached between two die cut stockings.


Here's the stocking filled with candy canes.  Though, if I wanted to actually give this filled with candy canes, I think I'd make the box part in the center a little shorter so that the candy canes stick up more.


Thanks for viewing.  If you'd like to get the Holiday Stocking die, click on the Order Online button in the upper right hand corner or contact me directly and I can place your order for you.

Saturday, November 26, 2011

Zoo Review Christmas Card

This card uses the polar bear from Zoo Review.  The sentiment is from Sincere Salutations and I can't quite remember which set the snowflakes came from -- Serene Snowflakes possibly.  The base of the card was run through the Big Shot using the Northern Flurry embossing folder.  Then I highlighted some of the snowflakes with Basic Rhinestones.


Ink:  Bashful Blue, Basic Black
Cardstock:  Whisper White, Bashful Blue, Not Quite Navy


Sunday, November 20, 2011

It's A Wrap Candy and Card

I wanted a small gift of candy and a coordinating card, so I used It's A Wrap Holidays and Circle Circus.  The stamps from It's a Wrap Holidays are the perfect size to cover Hershey's Nuggets (and when it comes to candy, you really can't beat chocolate!).


The four wrapped nuggets were loaded into a Stampin' Up small cellophane bag.  I used the Top Note die for the topper and attached it with Sticky Strip.  I stamped the 4 YOU image on another piece of Whisper White card stock and punched it out with the 3/4" circle punch.  I attached the punched circle to the image stamped on the topper with a Stampin' Dimensional, rotating it so that the words were upright.

Ink:  Night of Navy
Cardstock:  Night of Navy, Whisper White
Other:  Card: Silver Brads
Candy:  Cellophane Bags, Top Note die, Hershey's Nuggets


Thursday, November 17, 2011

French Foliage and It's A Wrap Holidays

It's a Wrap Holidays is not just for wrapping Hershey's Nuggets -- though the stamps are sized perfectly to do just that.  I used the set, along with French Foliage, to create today's card.


Cardstock:  Naturals Ivory, Soft Suede (textured), More Mustard
Ink:  Soft Suede, More Mustard, Daffodil Delight, Garden Green, Sahara Sand


Tuesday, November 15, 2011

French Foliage cards using Simply Scored

Have you seen the new Simply Scored tool?  I love it!  Makes scoring cards, boxes and other 3-d items so easy!  I'll be posting more projects using the awesome tool in the near future.  Today's cards use the Simply Scored to create the look of tiles.

We made the top card at the recent "Share the Wealth" party that I had.  If you missed it, you missed a good time.  Hopefully you can join us at my next event!


The bottom card is a simpler version.  It's cute for a quick notecard, but the twine in the top card really steps it up a notch.  I like the addition of the rain splotches in the top card, too.


Both cards:

Cardstock:  Naturals Ivory, More Mustard, Cherry Cobbler
Ink:  More Mustard, Cherry Cobbler, Soft Suede
Stamps:  French Foliage

Top Card also uses Hemp Twine and Sahara Sand ink

To create the tile look:  Use the Simply Scored tool to score top layer at 1/2" intervals both vertically and horizontally.  Stamp on the side where the score lines are inverted so that they give the look of the grout lines. 

Thursday, November 3, 2011

Digital Scrapbooking Day


Visit MyDigitalStudio.net November 4-7 and get free digital downloads.  These downloads can be used in My Digital Studio (a very cool digital crafting program offered by Stampin' Up).  However, the downloads are also compatible with most other design software.

Digital Scrapbooking Day is November 5, but Stampin' Up will keep the celebration going from November 4-7! The event will include free downloads, blog posts with exciting project ideas all weekend long, and the announcement of the 2011 My Digital Studio Contest winners.
Here is just one of the images you can download for FREE! 


There are four downloads total and each has multiple parts.

Hope you enjoy the fun at MyDigitalStudio.net!  If you have questions about this event or the My Digital Studio software, please contact me.  I'd be happy to hear from you!

(Remember, these are only available for FREE from Nov. 4-7! 
On Nov. 8, they will be added to SU's product offering for purchase.)


Wednesday, November 2, 2011

November Happenings and two Birthday cards

Hi Stampers!  Just wanted to fill you in on what's happening:

1)  Saturday, November 5th I will be having a "Share the Wealth Party."  See the Classes/Events page for details.  Hope you can make it!

2)  Hostess Bonus:  From now until Dec. 15 earn an extra $35 in hostess dollars with a party of $350 or more.  Click the button on the left for more details.

3)  Free Big Shot:  Sign up to be a Stampin' Up Demonstrator and get a free Big Shot (or $100 shopping spree).  Hurry, offer ends November 11th!  Click the button on the left for more details.

Now a little inspiration, two cards using the same colors and same stamps in a little different way:


Both cards use Wisteria Wonder ink and card stock, Whisper White card stock, and the following stamp sets:  Elements of Style and Sincere Salutations.

The top card also uses Stampin' Dimensionals to lift up the top layers.

The bottom card also uses the Vintage Wallpaper embossing folder and White 1/4" grosgrain ribbon. 


Sunday, October 23, 2011

NC SU Demonstrators Holiday Blog Hop 2011


I'm so excited to be part of the very first North Carolina Demonstrator's Blog Hop!  Follow the links to see an assortment of projects created by several talented Stampin' Up demonstrators, using products from the current Holiday Mini Catalog and this year's Idea Book and Catalog.

Both of my projects use the Bigz L Holiday Stocking Die.

The first project is a gift card holder.  The picture on the left shows the stocking with the gift card tucked away completely.  This allows the gift to be a secret until it is removed.  The picture on the right shows the stocking hanging from a hook on my hearth with the gift card sticking out - also a fun way to present a gift card.

I used the Big Shot to cut two stockings in Whisper White and the other pieces in Real Red.  The stockings were texturized using the Square lattice Embossing Folder.  You can see it better in the left picture, but I think it makes the stocking look quilted.  I added the red accents to each stocking and then used a thin bead of Tombow adhesive to attach the outer edges of the stockings to each other, leaving the top open.  This made the pocket to add the gift card (or cash or any other thin item) to.

The holly leaves were made with the Large Oval Punch, which I folded in half.  I then used the 1 1/4" Circle Punch and Paper Snips to shape the leaves.  The berries were punched with the circle punch from the Itty Bitty Shapes Punch Pack.  I added the Whisper White 1/4" Grosgrain Ribbon so the stocking could be hung.  How cute would they be hung on a Christmas tree?


My second project is a Christmas card.  I folded the card stock in half and lined it up just inside the top cut of the stocking die.  This left one long piece that folds over to make the card.  I made the cuff the same way, but made the cuff narrower.  This not only fit the card better since the cuff needed to line up with the top of the card, but by modifying the size the card can now fit in a Medium Square Envelope (p. 182 of the IB&C).

I used the Textured Impressions Designer Frames Embossing Folders Set to add the oval the card.  I stamped the image from Word Play and then punched it out using the Extra Large Oval Punch, which fit perfectly in the embossed oval.

This die is so full of possibilities.  Imagine making the gift card holder with Frostwood Lodge Designer Series Paper.  Or make fabric stockings with felt or Designer Fabric.  Fill with a little candy and you have a cute gift for a teacher or classmates.

This die isn't limited to Christmas, either.  What about a baby bootie?  How cute would that be at a baby shower?  I'll try to get some other ideas posted over the next couple of weeks.  Be sure to check back to see what I come up with.
www.makelifecreative.blogspot.com


I hope you've enjoyed this stop on the NCSU Demo Holiday Blog Hop.  Thanks for stopping by!  Click on the link above to go to the next blog to see more great projects (Tiffanie Doyle) or the link below to go back to see the variety of projects at the previous blog (Sharon Maranich).
Happy Stamping!

Friday, October 21, 2011

NC Demos Blog Hop

First off, let me apologize for neglecting my blog for so long.  I have been struggling with some health issues which have prevented me not only from keeping up my blog but from even being able to do much stamping.  As much as I love stamping and hate not being able to do it, even worse, I have had to miss family events and my kids' activities.  And anyone who knows me knows how hard that's been.  I appreciate my customers who have stood by me during this difficult time and hope that those of you who have followed my blog in the past will continue to do so.  Hopefully after the first of the year things will be a little more back to normal.  Until then, I'll try to post as I am able.

Now, for some exciting news....

On Sunday, October 23, I will be participating in the first ever NC Demos Blog Hop.  This will be an exciting opportunity to see the creative work of several demonstrators from North Carolina.  They will be sharing projects usings products from the current Holiday Mini Catalog and this year's Idea Book and Catalog.  You won't want to miss it!

Saturday, August 13, 2011

Wish Big Pennant

Here's another card made with the Petite Pennants Punch.  I used the Wish Big stamp from Word Play.  I inked each letter of wish separately and stamped them out with the punch.  The pennants are strung on white baker's twine that I dyed Elegant Eggplant.


Wednesday, August 10, 2011

Awash With Flowers using In Colors

Sometimes you just need a quick, simple card that's still cute.  I stamped two flowers using the set Awash With Flowers then cut out an embossed scallop square to use as a vase (or planter).


Awash With Flowers is a two-step stamping set, so I stamped the outline and then the color for the petals separately.  I used a separate stamp for the stems.  This gave me the flexibility to angle the stems the way I wanted them.


Sunday, August 7, 2011

Calypso Coral Daisy Die

I recently bought the Daisies #2 Die and this is the first card I made with it.  The center of the flower is a glimmer brad.  I love the sparkle that glimmer brads add.


Remember, you can order the supplies used in this card or any other Stampin' Up products here or by clicking on the the Order Online button.  Once you get to my demonstrator website, click Shop Now.

Thursday, August 4, 2011

Engraved Greetings in In Colors

Engraved Greetings is retired, but I still love this set.  It makes an elegant thank you or birthday card in a hurry.  If you didn't get this set before it retired, I happen to have a brand new one that I'd be happy to sell you.  Just let me know.

The top card uses the Sweet Button Embosslit which is great for making your own embellishments.  You can make cardstock buttons in any color you want to match your project.  On this card I made the "thread" with my Island Indigo marker, but on other cards I have used my 1/16" circle punch to punch out the holes and then used Linen Thread or Baker's Twine.


Monday, August 1, 2011

Flower Garden Embossing Folder with Four Frames

This card is similar to one I posted back in May.  To show you how versatile this layout can be, I used different ribbon and different stamps (Four Frames and Teeny Tiny Wishes).  The ribbon has retired, but you could use 5/8" satin ribbon in its place.


Friday, July 29, 2011

Petite Pennants Punch Baby Card

I used the Naturally Serif Decoritve Strip with my Big Shot to cut out the letters and then layered them on pieces punched with the Petite Pennants Punch.  I stamped the background with the bear from Family Accessories (which coordinates with All in the Family).  The Designer Series Paper on the pennants is from the Brights Patterns Designer Paper Stack.


Wednesday, July 27, 2011

Petite Pennants Punch Ice Cream Cone

I used the Petite Pennants Builder Punch to make an ice cream cone.  I've seen it done with the the coordinating stamp set (using the straight edged pennant) and Cupcake Builder Punch, but this is done with the scalloped pennant for the cone and uses the Scallop Circle Punch for the ice cream.


The Square Lattice Embossing Folder makes the cone look like a waffle cone and also gives texture to the background of the card.  I used Stampin' Pastels and Sponge Daubers to randomly add very light color to the raised embossing.  A Texturz Plate was used to add swirls to the ice cream.  The ice cream cone is layered on the larger scallop square from the Scallop Squares Duo die.

The sentiment comes from Sunny Fun.  I inked half of it up with my Island Indigo Stampin' Write marker and stamped it.  Then I cleaned the stamp and inked the second half of the sentiment so I could stamp it under the first half.  I punched it out with the Oval Punch and layered on the Scalloped Oval Punch.

Cardstock colors used:  Whisper White, Island Indigo, Pretty in Pink, Soft Suede.

Monday, July 25, 2011

Plant Hope in In Colors

Hi stampers!  Sorry it's been so long since I posted.  I've been on vacation to Michigan.  We went to my good friend's graduation party (she got her Ph.D. -- congratulation Melissa!) and had a great visit with family.

This card uses the stamp set Plant Hope.  I wanted to use some of the new In Colors and thought of this set.  I also used the larger scallop square from the Scallop Squares Duo die.

Tuesday, July 12, 2011

Pennant Punch Party Hats

I have been having so much fun with the new Petite Pennants Punch.  I love being able to use a punch for more than it's intended use and this one is easy to do that with.

I punched the hats from Whisper White cardstock with the Petite Pennants Punch, then used the Confetti stamp set to stamp them with various festive colors and designs.  I used the flower from the Itty Bitty Shapes Punch Pack to punch the pom poms in coordinating colors and I added a basic rhinestone in the middle of each.  I used the Birthday Builder Wheel along the bottom because I wanted the Happy Birthday to be big and bold.


Thanks for stopping by my blog.  Hope you enjoyed today's share.

LinkWithin

Related Posts Plugin for WordPress, Blogger...