Showing posts with label Trifold Shutter. Show all posts

Sunday, October 13, 2013

Love and Laughter Trifold Shutter Card

I love Trifold Shutter cards!  They are wonderful for special occasions.  And making the card base is really easy.  It's the designing that takes me a while, though some people are pretty quick at that, too.

We made this card in last month's club.  Speaking of club, we're starting a new round, so if you'd like to join, let me know.  We meet the 4th Tuesday (6:30pm) and Wednesday (10:00am) of the month.  You can see more details here.

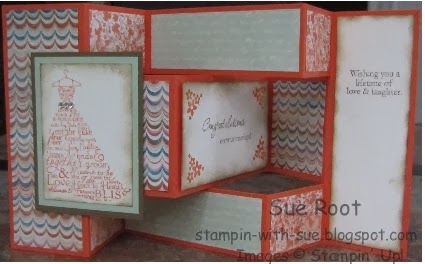
Here's the card standing up:

This is what it looks like closed:


And here it is laying flat so you can see each of the panels:


See what I mean?  Isn't this style of card really cool?

Supplies:

Stamps:  Love and Laughter
Cardstock:  Tangerine Tango, Very Vanilla, Pistachio Pudding, Soft Suede
Designer Series Paper:  Venetian Romance
Ink:  Tangerine Tango, Soft Suede
Embellishments:  Basic Rhinestones

If you like this style card, you can see other ones I've made here.

So, I said these were easy.  Here are some quick instructions.  Refer to the pictures if needed.

1) Start with a piece of 12" x 5 1/2" cardstock.

2)  Score along 12" side at 2", 4", 8" and 10"

3)  Rotate cardstock and cut from the 2" score line to the 10" score line at 1 1/2" in from the top and from the bottom.

So looking at the 12" side, there is a 2" panel on each end that is solid along the whole 5 1/2".  Between the two panels, there are three vertical strips 1 1/2", 2 1/2", and 1 1/2".

4) Fold.  The first panel folds back (mountain fold).  Then, the 2 1/2" piece (center) folds up (mountain fold), while the two 1 1/2" pieces (top and bottom) fold down (valley folds).  Move to the right and reverse (center is a valley fold; top and bottom are mountain folds).  Then, the last panel folds forward (valley fold).

Now it's ready for you to add your own creative touch.

Hope that makes sense.  If not, let me know and I'll add some pictures.


Thursday, June 20, 2013

Graduation Tri-fold Shutter Card

Here is the card I made for my daughter's graduation.  Yes, we gave it to her last week when she graduated.  It just didn't make it to the blog until now.

I chose to make a trifold shutter card because I think they make a very special card and I definitely wanted something extra special for such a big event.

Here is the front of the card.  I made a punch art gown and mortar board.  I tried to copy her graduation attire, but I left off one medal just because I couldn't get it to fit right.

 This card uses lots of retired items, mostly because her school colors are blue and gold.  When Stampin' Up! had the color renovation a few years ago, I hoarded Brilliant Blue because it is a perfect match.

The mortar board is just a square tilted to the side.  I cut the tassel out of card stock and attached it with a retired brad.   The purple cord was made with retired twine which I colored Elegant Eggplant with my Stampin' Write marker.  My hands were very purple afterwards!  I used one of the circles on the Owl Punch to punch the medal from Brushed Gold card stock.

Here are views of the card standing up and open (one from the front and then a top view):

Here's the card open and lying flat so you can see all the panels.  The stamps are from Word Play (retired - "Go Confidently in the Direction of Your Dreams" is perfect for graduation cards),  Designer Typeset Photopolymer (the graduation year - "2013"), Teeny Tiny Wishes ("Happy Graduation" on the bottom of the right panel) and Pure Gumption (all the rest).  The Designer Series Paper is Razzleberry Lemonade (retired).  The right panel is blank to allow for a personal message and signing.
 Here's what a Tri-fold shutter card looks like if instead of opening it according to the cuts and folds you just open it like a regular card (basically fold back the front panel).   You don't really open it this way, but if you decide to try to make one, this view might be helpful in letting you know that everything is laying right.
 I hope you've enjoyed seeing this card.  I spent a lot of time on it and poured a lot of love into it.


Thursday, June 28, 2012

Bright Birthday Trifold Shutter Card

This is the trifold shutter card that we made in the Fancy Folds class yesterday morning and Tuesday evening.  I love trifold shutter cards!  It takes me a while to design them because there are so many panels and sometimes it's hard to find small enough stamps, but the assembly is easier than it looks and the end results are well worth the time.

The main image on the front consists of 4 stamps from the Make A Cake stamp set.  The center image is from Delightful Dozen and the other two are from the hostess set, Happy You.

The Big Shot was used to emboss the Daffodil Delight pieces with the Fancy Fan embossing folder and to cut the front image and its background layer with the Labels Collection Framelits.  The flowers were punched with the Boho Blossoms punch and the centers with one of the punches from the Itty Bitty Shapes punch pack.
A great thing about Stampin' Up's Designer Series Paper (DSP) is how the sheets in a package coordinate with each other.  Often they coordinate with stamps and embellishments, too.  Another great thing is that the catalog lists all of the colors in the DSP so it's easy to choose colors for a project.

This is a view of the card when it's closed:


If you are part of my stamp club, you got to take this class for FREE.  If not, you were able to attend by paying a class fee.  Everyone there had a great time and enjoyed all three projects we made.  Don't miss the next one -- either Thursday, July 19th at 6:30pm or Wednesday, July 25th at 10:00am.  See the Classes/Events page or contact me for more details.  We'd love to have you join us!

Friday, June 3, 2011

Big On Christmas and Texturz Plates

Another great stamp set that is retiring is Big on Christmas.  It has three large images that are the perfect size for the center panel of a trifold shutter card.  The size is large enough so you can use it as the focal point for a regular card as well.

Here are two trifold shutter cards.  I've made more, but these are the only ones I can find pictures of.  If I run across more later I'll add them.  Like I said, the image fits perfectly on the center panel.  I also used the Texturz plates that are retiring on the tree and the tree trunk.
 Happy Holidays Open:


Happy Holidays Closed:


Noel Open:


Noel Closed:
There were a few non-SU stamps on the Noel card but that's because this was made before I got Jolly Bingo Bits which has lots of images that would fit nicely on this card.

The card I made using Let It Snow had a large Big Shot die cut snowflake on the front and smaller ones inside.  I can't remember much else about it right now, but if you get Big On Christmas and want more details, I'll do my best to help.

Saturday, May 21, 2011

Sense of Time Tri-fold Shutter Card

I needed an extra special card for a big birthday today.   I chose Sense of Time as the main stamp set.  I changed the tri-fold shutter card a little bit by making the front solid.

Here's the card standing up -- notice how the folds alternate between valley and mountain folds and how the middle fold is opposite of the top and bottom where they are aligned. 


I used More Mustard, Always Artichoke and Really Rust on this card, along with the retired Juntos Designer Series Paper.  I used my aqua pen and watercolor crayons to give the clock an antiqued look.  The following photo shows the card closed.

This card is loaded with embellishments.  I used Pewter Hodgepodge Hardware, circle brads, silver brads and twill tape on the front and Always Artichoke brads in the middle of the card.  Assorted punches were also used -- several circles, the ticket corner punch and the blossom bouquet triple layer punch (the flames on the candles).

Birthday Greetings (on the twill tape) came from On Your Birthday.  Make a Wish came from Mini Mates and The More Candles the Bigger the Wish stamp is from Whimsical Words.  The 5 and the 0 came from Alphadot Numbers.  But, you could use any small stamp in those spots.  All of the other stamps are from Sense of Time.

Here is the card laid flat so you can see each panel fully.


Thanks for looking!

Wednesday, January 6, 2010

Trifold Shutter Cards

Here are a couple of trifold shutter cards I've done recently.

The first card uses the Vintage Vogue stamp set from the new Occasions Mini Catalog. This catalog has tons of great, new stuff in it! Most of the new sets are now available as clear mount sets (or as wood mount). The stamps are still the high quality rubber with foam backing that you are used to with Stampin' Up stamps. Instead of being mounted on wood, these stamps come unmounted. When you are ready to use one, stick the stamp on an acrylic block and stamp away. When you are done, remove the stamp from the block and return it to its case.

The acrylic blocks SU sells are as thick as the wood blocks, with rounded corners and grooves in the sides for easier handling. The new clear mounts are easy to use and give the same great results you are used to with the wood mount stamps.

In addition, the new clear mounts are cheaper and take up way less space. Each set comes in a case about the size of a DVD case. You can tell I love them. I was just going to upload a couple of cards and ended up writing three paragraphs about the new clear mounts.


LinkWithin

Related Posts Plugin for WordPress, Blogger...