Showing posts with label scrapbooking. Show all posts

Saturday, May 17, 2014

Epic Day Hexagon Scrapbook Page

I had the Epic Day class today and it was so much fun! I'll share pictures of the event tomorrow - including some new cards.

Right now, though, I have some scrapbook pages to share. These were out as a sample of pages that people could copy.

 These won't stay this way - I pretty much just took the pictures off my other pages so I could show a completed sample. It was easy to do since I used Epic Day Washi Tape to adhere the pictures. Since the pictures are in a different order, I put a long strip of washi tape over part of the caption (since it was no longer correct with the new arrangement).

You'll see I moved the interior hexagons a bit. When I added the pictures, it just seemed better this way. I tucked some of the pictures under the hexagons.

Thanks for stopping by my blog. Be sure to stop back tomorrow to see more Epic Day samples and pictures from today's event.

Friday, May 9, 2014

Epic Day Scrapbook pages

I like this two page spread because you can flip it around for a different look. I photographed the pages a little apart because they'll be separate in a book, but if you have them together, they make one continuous design.

Here's the way I originally designed the page. It was easy with my Simply Scored Tool and the Diagonal Plate.

I really like the color combination of this sheet of Epic Day Designer Series Paper (DSP) and Basic Gray. The accent strip is Smoky Slate.


These pages won't stay this way, but I wanted to show you a completed sample. I particularly liked using the Epic Day Washi Tape to hold down the pictures and title. The colors coordinate with the page and I think it adds to the look. The Washi Tape is even quicker than using SNAIL. Another bonus of the Washi Tape is that items on the page can easily be rearranged. A good option when I'm afraid more pictures from an event or trip might turn up.


I made the happy discovery that the pages can be switched for a coordinating look.


If  you are coming to the 5/17 class, you can make this layout - and lots of other stuff :)

Saturday, May 3, 2014

Happy National Scrapbooking Day!

Today is National Scrapbooking Day, so I made some scrapbook pages. I only got one photographed before it got too late so I'll have to share more later in the week.

This Designer Series Paper (DSP) is from Epic Day. They are kind of hard to see in these photos, but the background is a bunch of words. They say things like courageous, happy, insightful, honest, bold, strong, delightful, independent... The words made me think of my daughters, so I had to make a scrapbook page with them on it.

 The title and the words along the left side are from the retiring set, Loving Thoughts. I tried to leave lots of space so I didn't cover the words on the DSP. Instead of making a tag with the date on it, I used the Remember This Rotary Stamp to stamp, "This happened on..." Because of the way the rotary stamp works, I was able to set the date to day these pictures were taken.

This photo was taken at an angle to make my girls look even taller than they are! :) Actually, I thought it would show how I used Stampin' Dimensionals to pop up the title and the other word stamp between the Pool Party and River Rock layers. I also popped up the starburst.
 I love this stamp from Starburst sayings - You make the world a better place. It definitely applies to my girls. I also love that there are matching framelits so I can use the Big Shot to cut it out.
 It's kind of blurry, but this is the little piece above the date. The stamp is from the retired Sale-a-Bration set, Sprinkled Expressions, and says - Love you just the way you are. This close-up shows how I used my distressing tool to distress the edges.
Thanks for stopping by my blog. Hope you got a change to do some scrapping today!

Friday, May 17, 2013

Photo Wallet - Elements of Style

Recently I made this cute little photo wallet using one of my favorite Stampin' Up! sets, Elements of Style.  I can't believe it's retiring.

Here's the photo wallet closed:
Here it is opened all the way.  You can mount pictures on the solid pieces and journal on the Whisper White ones.  I used a light colored ink on the journaling pieces so that the writing will still be readable (as long as you use a dark ink).

 Here it is partially open (or partially closed, depending on your view point).  There are two spots for more photos and a pretty stamped center.
 This is the belly band that holds it closed.
We'll be making one of these in an upcoming class, so keep an eye on the Classes/Events page to find out when.  The one we make in class will be different since Elements of Style will no longer be available.  It's a great set.  If you don't have it, be sure to get it before it's gone.

Monday, March 25, 2013

TSSC 256 (MDS Projects)

I did something different this week for the Techno Stamper (Monday Lunchtime) Sketch Challenge.  When I first saw the sketch I thought of a scrapbook page.  Then I decided to use My Digital Studio (MDS) to create it.  I'm going to walk you through how I ended up submitting a card for the challenge so you can see just how easy it is to get a variety of projects from one idea.  I like all three projects and hope you do, too.

Here is this week's sketch:
 
 Here is the 8.5" x 11" scrapbook page I designed in MDS.  With the background paper that I chose, it really went together quite quickly:

 You could add as many or as few photos as you'd like.  This is how I chose to finish my page:


Supply List

Background
     Designer Series Paper\Vintage Overlays - designer series paper

Embellishments
    Designer Kits\You're My Sunshine - embellishments - large flower 1
    Designer Kits\You're My Sunshine - embellishments - large flower 2 (two of them)
   
Stamps
    Word Play\Word Play - remember when whole

Punches
    Basics\1.25 Square Punch, Fill Color = SO SAFFRON (4 - to make mats behind photos and journaling)
   
Photos (used photo box w/mat)
    
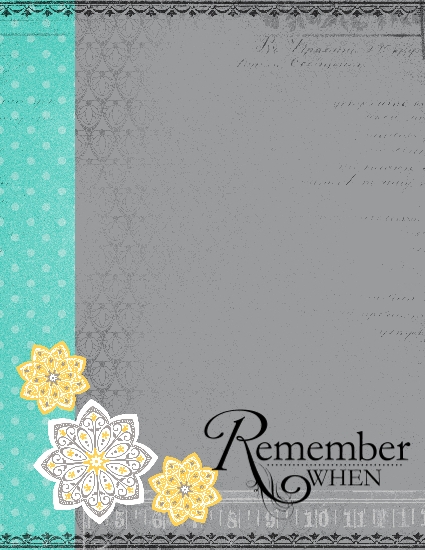
Looking at the scrapbook page, I decided that with a few changes it would make a nice card.  Using the option to Change Project Size/Type (under Edit), I easily made a card.  I changed the sentiment to hello, which seemed like a good sentiment for this card.  The stamp originally was black, but there is an option to easily change the color.
Supply List 

Background
     Designer Series Paper\Vintage Overlays - designer series paper

Embellishments
    Designer Kits\You're My Sunshine - embellishments - large flower 1
    Designer Kits\You're My Sunshine - embellishments - large flower 2 (two of them)
   
Stamps
    My Friend\My Friend - hello

As I was using the Search feature to look for a sentiment that I'd like on the card, I ran across a set I hadn't seen before (Adventure Awaits).  I really liked it and decided that I had to make a card with it.  I also thought it needed a new sentiment, so I picked one from Daring Adventure.  That's one of the many great features in MDS.  Once you have a project, you can easily make changes to end up with similar but different projects.  Here's the final card I made.  It is also my sample for this week's Techno Stamper Sketch Challenge (though any of them would have worked).


Supply List 

Background
     Designer Series Paper\Vintage Overlays - designer series paper

Stamps
    Daring Adventure\Daring Adventure - or nothing
Adventure Awaits\Adventure Awaits - hot air balloon 

Funny thing, while looking at the balloon card I thought that if I shrunk down the stamps a bit that it would make a good scrapbook page.  It would be easy enough to do...

I hope you've enjoyed seeing the projects today and the thought process behind going from a scrapbook page to a card that only has one item the same as the original.

Remember to head over to the TSSC page to see the other design team samples and to link your entry for this week's challenge.

Thursday, May 5, 2011

Travel Log - Scrapbook Pages

When I first saw the stamp set Travel Log, I thought it would be perfect for scrapbooking.  I was right.  I created this two page, 12 x 12 layout.  Apparently I need to go on a trip, though, because I didn't have any photos for these pages.  So, I just put a piece of paper where each photo should go to give you an idea of what it will look like finished. 


Here is each page separately to try to let you see a few more of the details.  The rectangle on the left is for you to list your Itinerary.  The travel log highway sign has lines so you can do a small bit of journaling.  The border on each page is made using the map stamp over and over.  I connected the lines on the maps using a matching color Stampin' Write marker.


If you need even more room for journaling, you can use the area where I show the 4" x 4 1/4" photo.  Just add a piece of Naturals White cardstock instead of a photo.  You can add lines to the cardstock using the Dotted Lines jumbo wheel to make your journaling easier.


Supplies:

Cardstock:  Naturals White, Not Quite Navy, Cherry Cobbler, Old Olive
Ink:   Not Quite Navy, Cherry Cobbler, Soft Suede
Stamps:  Travel Log
Accessories:  Serif Essentials Alphabet dies, Big Shot

Thursday, January 20, 2011

Accordion Album

I just made this 3 x 3 accordion album.  It's the first one I've ever done and there was definitely a learning curve involved! :)  I CASEd a design that was sent to me through Stampers X-press, a Stampin' Up! group.  If you sign up to be a demonstrator, you could be in this group, too.  They send lots of great ideas and provide tons of business support.  And, Sale-a-bration (which starts 1/25) is a great time to join SU!  Check back on 1/25 to see why.

Want to see how this accordion album works and what it looks like inside?  Come to my Open House on Saturday between 10:00am and noon.  I'll also have a make and take.  Need directions?  E-mail or leave a comment on this post.


LinkWithin

Related Posts Plugin for WordPress, Blogger...