Showing posts with label Word Play. Show all posts

Monday, October 7, 2013

TSSC 283 - MDS (Word Play)

Good Morning Stampers!  I made today's Techno Stamper Sketch Challenge card in My Digital Studio (MDS).  While crafting on the computer will never replace doing it with cardstock, stamps and SNAIL (and punches, and my Big Shot, and embellishments, and all the other cool Stampin' Up! stuff I own), I do have fun doing it.  And the quality of the print products from Stampin' Up! is top notch!


I chose the colors because the sketch specifically says, "Happy Sentiment."  Bright colors always seem happy to me.  And the sentiment spoke to me because it seems positive (and therefore happy) to Imagine the Possibilities.

Here is this week's sketch:
 

 I hope you'll let this week's sketch inspire you and I hope your week is happier for it!  You can link your project and see the rest of the design team samples here.

Happy Stampin'!  Sue

Friday, June 21, 2013

Graduation Gift

My daughter and I decided to make these for graduation presents for her friends.  I saw some similar items on Pinterest and I've gotten candy bouquets before, so this is what we came up with.  It turned out to be a family event with a little help from several people.  It's hard to see, but there are Hershey's Kisses in the bases.

 We etched each girl's first initial on their glass.  It's a little hard to see, but here's a close-up.  We made our own stencils using the Big Shot, Contact Paper, and alphabet dies.
The stamps are from assorted sets:  Word Play, Morning Post Alphabet, Blue Ribbon, and Whimsical Words.  I was wishing I had the Rosette Die as I scored and folded all those rosettes!  I had originally planned to just have the whole glass filled with Kisses, but they wouldn't hold up the inserts.  So, I ended up getting some floral foam (which the tissue is covering).  Then I put the Kisses on top.

They ended up taking longer than I thought they would, but my daughter was pleased with them and her friends all seemed to like them, so it was worth it.

Thanks for stopping by my blog.  I hope today's post has given you some inspiration.

Thursday, June 20, 2013

Graduation Tri-fold Shutter Card

Here is the card I made for my daughter's graduation.  Yes, we gave it to her last week when she graduated.  It just didn't make it to the blog until now.

I chose to make a trifold shutter card because I think they make a very special card and I definitely wanted something extra special for such a big event.

Here is the front of the card.  I made a punch art gown and mortar board.  I tried to copy her graduation attire, but I left off one medal just because I couldn't get it to fit right.

 This card uses lots of retired items, mostly because her school colors are blue and gold.  When Stampin' Up! had the color renovation a few years ago, I hoarded Brilliant Blue because it is a perfect match.

The mortar board is just a square tilted to the side.  I cut the tassel out of card stock and attached it with a retired brad.   The purple cord was made with retired twine which I colored Elegant Eggplant with my Stampin' Write marker.  My hands were very purple afterwards!  I used one of the circles on the Owl Punch to punch the medal from Brushed Gold card stock.

Here are views of the card standing up and open (one from the front and then a top view):

Here's the card open and lying flat so you can see all the panels.  The stamps are from Word Play (retired - "Go Confidently in the Direction of Your Dreams" is perfect for graduation cards),  Designer Typeset Photopolymer (the graduation year - "2013"), Teeny Tiny Wishes ("Happy Graduation" on the bottom of the right panel) and Pure Gumption (all the rest).  The Designer Series Paper is Razzleberry Lemonade (retired).  The right panel is blank to allow for a personal message and signing.
 Here's what a Tri-fold shutter card looks like if instead of opening it according to the cuts and folds you just open it like a regular card (basically fold back the front panel).   You don't really open it this way, but if you decide to try to make one, this view might be helpful in letting you know that everything is laying right.
 I hope you've enjoyed seeing this card.  I spent a lot of time on it and poured a lot of love into it.


Monday, May 27, 2013

TSSC 265 My Digital Studio (Graduation and Father's Day)

So, last week I mentioned that I haven't been getting the best pictures lately.  I should have been happy with what I had.  We had a little mishap at my house and the entire memory card appears to have been wiped clean.  At first I thought I might not be able to do this week's Techno Stamper Sketch Challenge since I couldn't photograph my sample to upload it to my blog.  But, once again, My Digital Studio (MDS) has come to the rescue!

Graduation is right around the corner and I need to get busy with some graduation cards.  I like to use school colors when I can, so this one is made with Garner High School (where my girls go) colors.  One nice thing about MDS is that it's very easy to change the colors, so it would be a snap to adjust this card for a graduate from another school.

I think the stamp that I used from Word Play is great for graduation cards.  Then again, I think the whole set is pretty great.  It's too bad it's retiring.  You only have until June 3rd to get it.  Sets in My Digital Studio never retire, so you'll still be able to get the digital version, but I'm glad I have both.

I used a text box to get the words on the banner, which I capped with arrows to mimic the arrow in the stamp.

Here is this week's sketch:
And here's a bonus card.  I used My Digital Studio and the set All Holidays to make a Father's Day card.


Head on over to the Techno Stamper Sketch Challenge site to see the samples from the rest of the design team and to link your own entry.   Stretch your creativity this week by playing along.

If you have questions about linking your entry, please feel free to ask.

Happy Memorial Day!  Thanks to all of our active duty military personnel and to our veterans for their service!  Be sure to take time to remember those who paid the ultimate price for our freedom.  After all, that's what this holiday is all about.

Thursday, April 11, 2013

Relay for Life Fundraiser Projects

Here are the projects we'll make at the Relay for Life fundraiser on April 20th.  I sure hope you can join us to benefit this cause that's so important.  You can see more details about the fundraiser here.

We will make four projects - 2 cards, a treat pouch and a corner bookmark.  Two of the projects can be customized.


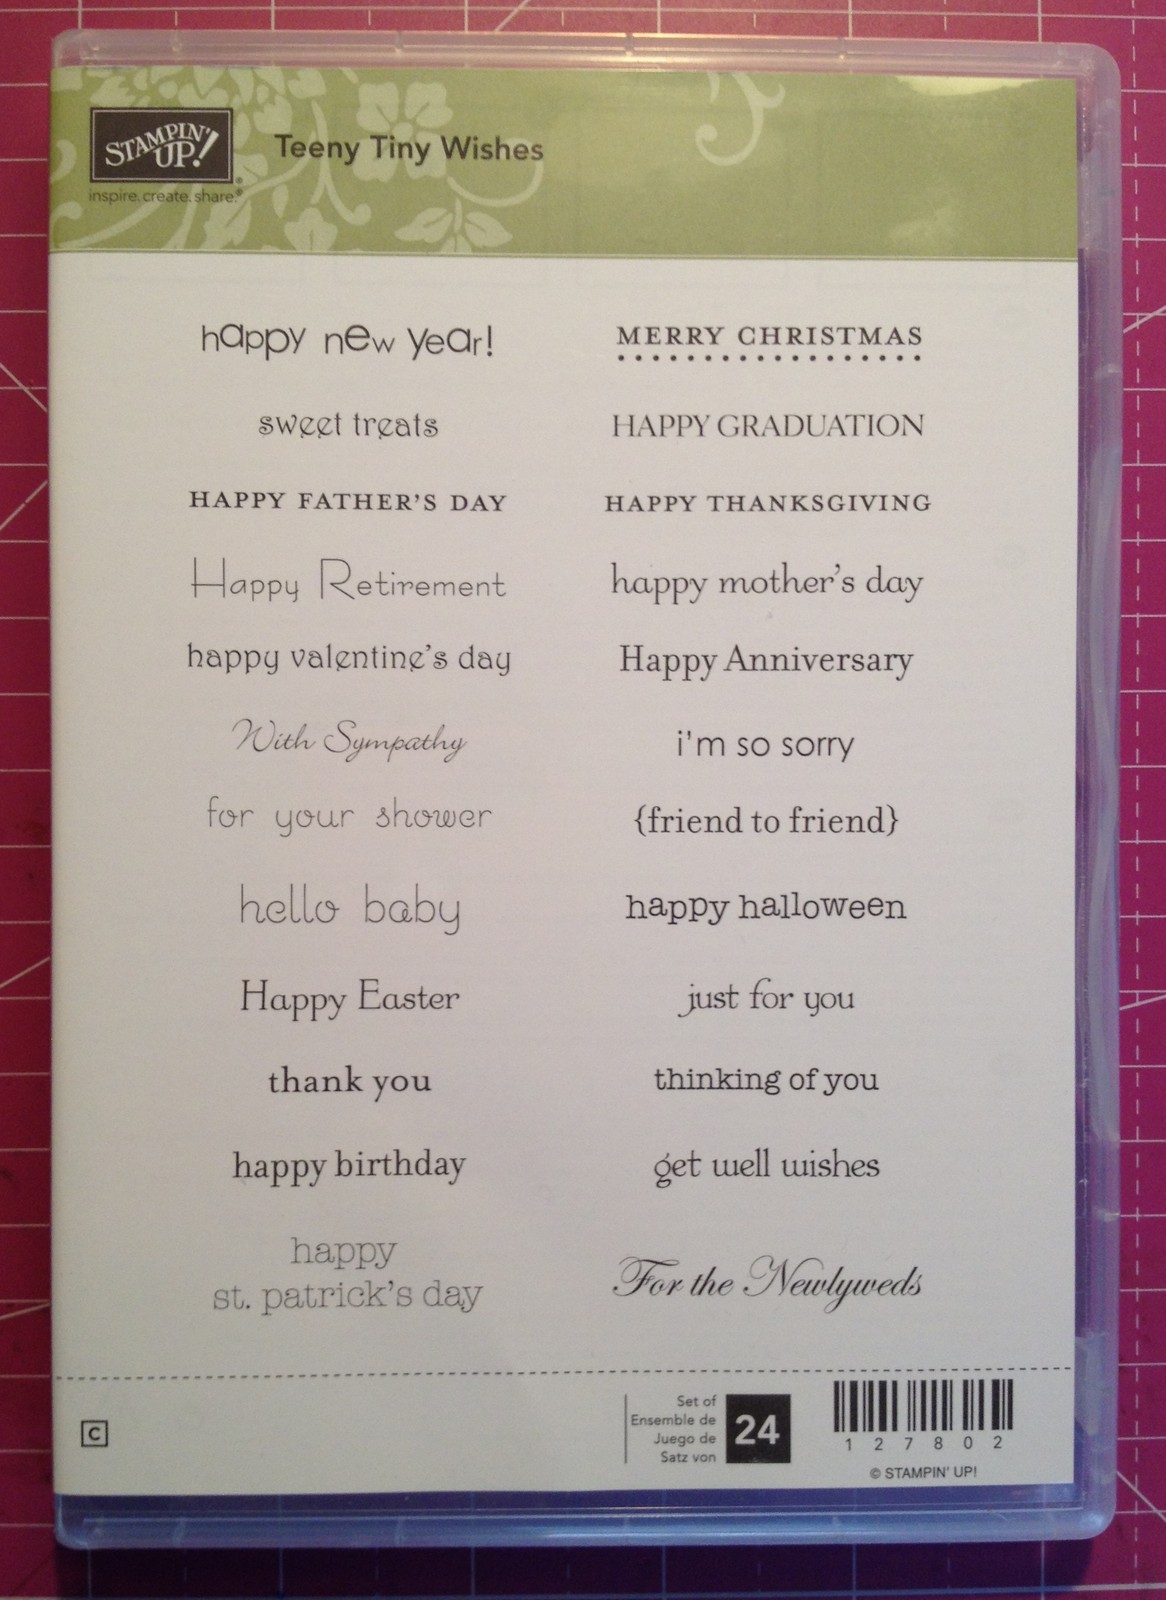
 Participants will be able to select the sentiment for the Wild Wasabi card.  Any stamp from Teeny Tiny Wishes will fit in the Word Window punch.  As you can see, there are lots of options:

There are three option for the treat pouch "FRIEND" (shown in top picture), "congrats grad" or "Happy Birthday".  The bottom treat pouch is shown with candy to give you an idea of how to fill it.

 Here's the bookmark in a book.  It goes over the corner of your page so that it doesn't fall out.
You can register for the class by e-mailing me or choosing RSVP on my Stampin' Up! website.  Sure hope you can come!

Saturday, January 5, 2013

Designer Cuts cards

The two cards in today's post were made with the Designer Cuts Cards and Envelopes set.  This set is retired, but the samples show how easy it is to make beautiful cards when you start with a card kit.  Both of these cards went together quickly and easily.  The sentiment on the card on the left is from Feeling Sentimental which is one of the many great products you can get for free during Sale-A-Bration (beginning Jan. 22).  The sentiment on the heart card came from Word Play.
We'll make these two cards, plus three others at the Retired Products class on Jan. 9 and 10.  There's still time to register, so contact me today if you're able to come.  Some of you may wonder why I'm offering a class that uses retired products.  It's because several of my customers have asked for it and as their Stampin' Up demonstrator I want to meet their stamping needs.  If you don't have a demonstrator yet, choose me and I'll give you the kind of attention you deserve.

Saturday, July 21, 2012

Yesterday I showed you two of the projects from this month's stamp club meeting.  This is the third project we made.  It uses Bright Blossoms and Word Play.

 
If you'd like to make these projects contact me to register for the class on Wednesday, July 25th, at 10:00am  (the second offering of this class).

Monday, April 9, 2012

Faux Suede

The flower on this card looks so soft because it was made using the faux suede technique.  Come to my class Tuesday or Wednesday to learn how.  See details of all of my upcoming events here and then e-mail me to register.


I used Daffodil Delight Seam Binding and the Bright Blossoms stamp set (the leaves) from the Summer Smooches promotion on this card.

I often use Fire Circle Rhinestone brads for the center of flowers, as I did on this card.  They add a nice bit of sparkle.  The sentiment is from the set Word Play, which has lots of great sayings.


Sunday, December 18, 2011

Word Play Christmas

There's still time to get those Christmas cards done.  Here's another quick one.  I used the Big Shot and the Northern Frost Decorative Strip to cut the snowflakes.  The stamp is from Word Play.


Sunday, October 23, 2011

NC SU Demonstrators Holiday Blog Hop 2011


I'm so excited to be part of the very first North Carolina Demonstrator's Blog Hop!  Follow the links to see an assortment of projects created by several talented Stampin' Up demonstrators, using products from the current Holiday Mini Catalog and this year's Idea Book and Catalog.

Both of my projects use the Bigz L Holiday Stocking Die.

The first project is a gift card holder.  The picture on the left shows the stocking with the gift card tucked away completely.  This allows the gift to be a secret until it is removed.  The picture on the right shows the stocking hanging from a hook on my hearth with the gift card sticking out - also a fun way to present a gift card.

I used the Big Shot to cut two stockings in Whisper White and the other pieces in Real Red.  The stockings were texturized using the Square lattice Embossing Folder.  You can see it better in the left picture, but I think it makes the stocking look quilted.  I added the red accents to each stocking and then used a thin bead of Tombow adhesive to attach the outer edges of the stockings to each other, leaving the top open.  This made the pocket to add the gift card (or cash or any other thin item) to.

The holly leaves were made with the Large Oval Punch, which I folded in half.  I then used the 1 1/4" Circle Punch and Paper Snips to shape the leaves.  The berries were punched with the circle punch from the Itty Bitty Shapes Punch Pack.  I added the Whisper White 1/4" Grosgrain Ribbon so the stocking could be hung.  How cute would they be hung on a Christmas tree?


My second project is a Christmas card.  I folded the card stock in half and lined it up just inside the top cut of the stocking die.  This left one long piece that folds over to make the card.  I made the cuff the same way, but made the cuff narrower.  This not only fit the card better since the cuff needed to line up with the top of the card, but by modifying the size the card can now fit in a Medium Square Envelope (p. 182 of the IB&C).

I used the Textured Impressions Designer Frames Embossing Folders Set to add the oval the card.  I stamped the image from Word Play and then punched it out using the Extra Large Oval Punch, which fit perfectly in the embossed oval.

This die is so full of possibilities.  Imagine making the gift card holder with Frostwood Lodge Designer Series Paper.  Or make fabric stockings with felt or Designer Fabric.  Fill with a little candy and you have a cute gift for a teacher or classmates.

This die isn't limited to Christmas, either.  What about a baby bootie?  How cute would that be at a baby shower?  I'll try to get some other ideas posted over the next couple of weeks.  Be sure to check back to see what I come up with.
www.makelifecreative.blogspot.com


I hope you've enjoyed this stop on the NCSU Demo Holiday Blog Hop.  Thanks for stopping by!  Click on the link above to go to the next blog to see more great projects (Tiffanie Doyle) or the link below to go back to see the variety of projects at the previous blog (Sharon Maranich).
Happy Stamping!

Saturday, August 13, 2011

Wish Big Pennant

Here's another card made with the Petite Pennants Punch.  I used the Wish Big stamp from Word Play.  I inked each letter of wish separately and stamped them out with the punch.  The pennants are strung on white baker's twine that I dyed Elegant Eggplant.


Sunday, June 5, 2011

Cupcake Card

The retiring product on this card is the Big Bold Cupcakes die set.  I texturized the top with a polka dotted texturz plate (not from the retiring pack) and the bottom with my crimper.  You can use this die set with the cupcake punch to have different size cupcakes on your project.  The variety really opens up the possibilities.

I used the Birthday builder wheel along the bottom of the card.  Did you know they could be used alone?  That's part of what makes them so fun -- you can mix and match them in so many ways.


Friday, May 13, 2011

Open Sea Globe box

This box is made with the Box #2 die.  I wanted a masculine way to give a gift card (it fits in at an angle) and this did the trick.  I realized after I made it that had I made the base Naturals White instead of Sahara Sand, it would have coordinated with the card posted here.  I'll keep that in mind when I start getting Father's Day gifts around.

And yes, the sentiment is mounted on the box straight.  It's just my photography that's crooked.


This box was super easy to make, thanks to the Big Shot and box #2 die!  I stamped the resulting die cut all over with the globe from Open Sea.  After assembling the box, basically folding it on the score lines and then adding Sticky Strip to one little flap, I used Stampin' Dimensionals to mount the sentiment from Word Play.  That phrase pairs so nicely with the globe stamp!

I angled the edges of the flap and then tucked  it under the top of the mounted sentiment.  I used some brads for decoration and wrapped the Early Espresso/White baker's twine around the box a couple of times and tied it the ends together.  Like I said -- easy!

Wednesday, May 11, 2011

Project Give Thanks Cards

Last night I had the opportunity to make cards with our United Methodist Women group for Project Give Thanks.  You can learn more about the project here:


We made these cards so that we can start supplying a local cancer center.  There are over 60 cards here and these are just the ones I designed and prepped.  Another woman from our church also prepared for the evening and total we made about 100 cards and over 40 bookmarks (to put in the cards).  Great job ladies!

Next Wednesday morning, I will be doing this again with our UMW morning circle.  If you are in the Garner/Raleigh/Southern Wake County area and would like to help with this project, we'd love to have you.  E-mail me and I will gladly send directions (or an address if you want to mail cards you've already made).


I used an assortment of supplies on the above cards, some retired and some current, most of it Stampin' Up (the cream colored base on the embossed card is the only thing that isn't SU).  I tried to keep the cards simple since we were making so many of them and also because I didn't want to overwhelm anyone who might be new to card making.

The top card is Crushed Curry.  The flower is made with the Blossom Petals Punch and the sentiment is from Because I Care.  Next to it I used the Elegant Bouquet embossing folder with a sentiment from Kind and Caring Thoughts.  The last one in the top row uses the Butterfly embosslit.  The stamp set is from last year's Sale-a-bration.

The card on the bottom left uses the set Botanical Blooms and the thank you from Because I Care.  Do you know where the Certainly Celery and Pink scalloped layers came from?  The Princess Pary Kit!  We'll make more cards using elements from this kit on Wednesday morning.

The card in the middle bottom uses Sunny Fun and Word Play (which is 30% off this month -- contact me if you'd like to order it).  The one next to it uses Engraved Greetings and Punch Potpourri (it's hard to see, but it's in the upper right corner).  The 1/4" Whisper White grosgrain ribbon also came from the Princess Party Kit, which is available on the Clearance Rack.

Thursday, April 28, 2011

Father's Day - World

Have I mentioned that I love the new Summer Mini Catalog?  I am so glad that as a demonstrator I got to pre-order whatever I wanted from it!  It goes live for everyone on May 1st.

The front of this card uses the world from Open Sea, the map from Travel Log and a verse from Word Play -- a lot of sets, but they just seemed to go together.  Tied on the left is Baker's Twine, which is also new.  I have the Early Espresso/White.  It also comes in Cherry Cobbler/White and all White.  You get 25 yards of it for only $2.95.  Guess what's going to be on my next order!

I stamped the Always Artichoke background and ran it through my Big Shot with a Texturz Plate.  I stamped the world in Always Artichoke ink and mounted it on Early Espresso cardstock.  I stamped the phrase in Not Quite Navy ink and mounted in on cardstock of the same color.


And here's what I did with the inside:


The Interstate sign is from Travel Log.  Across the top it says TRAVEL LOG, but I used my blender pen and Not Quite Navy ink to fill in the letters.  I used Cherry Cobbler ink for the Happy Father's Day stamp, which is from Teeny Tiny Wishes.

We will be making this card at my upcoming Masculine Card Class.  Of course you can choose any sentiment from Teeny Tiny Wishes so you can tailor the card to your needs.  You can see the details on my Classes page.

Thanks for checking out my blog today!  Sue

Monday, April 18, 2011

Graduation Celebration

Here are the three graduation cards we'll be making at the Graduation Celebration class next week.  The colors on two of the cards can be coordinated to your graduate's school colors.  The third card is made with fun colors that will work for anyone.

The red and white card (I was thinking NC State) has white grosgrain ribbon and a stamp from Word Play that I love (Go confidently in the direction of your dreams).  It can be made with any color combination (see below for the Appalachian State version).

I really like matching the colors in a graduation card with the graduate's school colors, but sometimes that's not possible. That's why I designed the card on the top right.  The stamp from Word Play, Imagine the possibilities, seemed perfect with the graduation cap and diploma..  Thanks to my daughter for her help as I tried to figure out how to make the graduation cap.  You can't really tell in the picture, but the top of the cap is popped up from the other part.


The bottom card is also a gift card holder.  You can see the inside and more details here.  The ink colors inside can be personalized if you know the school colors (I used Garner Blue and Gold) but they don't have to be.

I must have been thinking of Appalachian State when I was making graduation cards because I made several in black and gold before I realized it.  I started with the star card and since I used gold for the stars, the color combination made sense.  I just got on a roll after that.  I have another I'll post in a few days.


(We won't be making the star card.  I just added it to give you another idea.)

For details about the Graduation Celebration class and other events I have planned, see the Classes Page.  I will be updating this page soon with May's events.


Friday, April 15, 2011

Graduation Cap Gift Card Holder and Card

Hi Stampers!  I'm really excited about today's card.  A long time ago I had a template for a graduation cap that also was a gift card holder.  It involved a lot of tracing and cutting.  I went to find it this year and then decided I really didn't feel like tracing and cutting.  After all, that's why I own a big shot! LOL

So, here's one of the cards we'll be making in the Graduation Celebration class on 4/27 (evening) and 4/28 (morning).  See the full details on the Classes page.  Also, I had a request to offer this on a weekend.  Let me know if you'd prefer that and I'll add another session.  But let me know soon so I can order supplies!

The front uses the Square Scallop Bigz Clear die.  I think it makes a fun cap shape.  I used a 5/8" jumbo brad and grosgrain ribbon for the tassle.  I was very happy when I asked my daughter if she knew what it was supposed to be and (after looking at me as if I was asking a trick question) answered a graduation cap.  Always good to make sure someone else is seeing the same thing I am :)


Here's the inside of the card.  I chose to make the back straight and a little smaller.  It seemed more like the cap part that way (not that I made it 3-d, but once I think of something like that, I've got to go with it).  I scored the back piece of card stock at 3/8" and folded it to make a hinge (I guess that's the best word for it).  Then I ran SNAIL adhesive along the hinge part and attached it to the scallop square so that when you open the card you don't see the hinge.  The gift card is in no way an advertisement.  It just happens to be one I had on hand for demonstration purposes.


I added a little bonus message when the card is removed.  I was thinking something like, "Imagine the possibilities that await you now that you've graduated."  My teenage daughter thought this, "Imagine the possiblities that you can spend this gift card on."  LOL  Either way, it works and I kind of like the double meaning.


The two top messages are from Word Play, a set with lots of good, unique sentiments.  Congratulations comes from the hostess set in the Occasions Mini Catalog, Something to Celebrate and Happy Graduation is from that extremely useful set, Teeny Tiny Wishes.

Hope you enjoyed today's card.  Contact me to register for the Graduation Celebration class to make one of your own.

Sue Root, Stampin' Up Demonstrator

Saturday, January 22, 2011

Button Button

We made this card at the Open House today.  We had a good time stamping, socializing and sharing ideas.  If you missed this one, maybe you can make it to the next one or to one of my classes.  See the Classes page for information on upcoming events.


This is a variation of the previous card.  I really like the basic pearls in the button holes.  I used my white gel pen on the other Tempting Turquoise button (though it's kind of hard to see in this picture).


LinkWithin

Related Posts Plugin for WordPress, Blogger...