Tuesday, May 31, 2016

Fun Fold Cards

I know the SAB items are no longer available and some of the other items are retiring in a few hours, but I found these pics as I was cleaning my hard drive and thought they might interest you. You can substitute current products and try your own card of this style.

Here are two cards of the same style. For each the sequence of photos is the same - closed, the top flap open, and then all the way open.
 
Supplies: Petite Petals stamps and punch, Bloomin' Love stamp set, SAB DSP, and coordinating cardstock and ink.


Supplies: Picture Perfect stamp set, Cups & Kettles framelits, Timeless Textures stamp set, SAB DSP, and coordinating cardstock and ink.


Love You Sew

On the last day of this catalog, I just want to say to all of my customers, blog readers, and followers on social media -- I Love You Sew! Thank you for letting me be a part of your stamping experience.

There is still time to get this cute hostess set, but not much.  Since it is a hostess set, in order to get it you need to place a $150 or more order to qualify for hostess benefits. Order by midnight (Central time) tonight to get any of the retiring items, including this set.

I used the envelope punch board to make the indented sides of the spool.
 This angle helps show the spool shape.

The new catalog, which starts tomorrow, has a lot of very cute hostess sets. Of course you can get them with a $150 order, but since that's a lot to spend at one time, there are other options. Host a party and I'll come do a project with you and your friends while you all have fun being creative. During June, if your party reaches $350 (which is very achievable -- I'll help coach you to maximize your party sales), get a BONUS $35 in hostess merchandise (that's in addition to the regular hostess merchandise). Contact me today to book your party.

Or, join stamp club. Make a minimum monthly purchase throughout the club period and qualify for a free class each month, get a free catalog, and be the hostess for the entire club order one month. Contact me for complete details, including how to join.

I look "sew" forward to leading a party for you, having you join stamp club, and helping you with any other stamping needs.

Monday, May 30, 2016

For Your Country Patriotic Card

Happy Memorial Day!

This is the 150th anniversary of Memorial Day, which originally started out as Decoration Day. I am so grateful for the men and women who have fought to protect our country and preserve our freedom. Thank you!


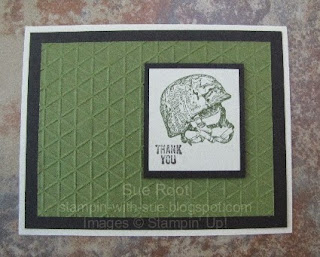
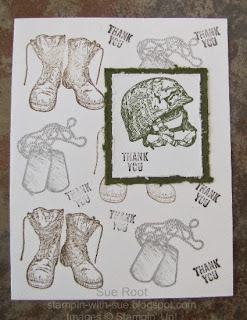
This card features the patriotic set For Your Country. You can use this set to make cards for soldiers or soldiers' families, Memorial Day cards, 4th of July cards, and other patriotic projects. But those boots would also be great for masculine or construction projects. I'm sure there are other ideas.The Designer Series Paper (DSP) is Go Wild, which is also retiring.

For Your Country Wood-Mount Stamp Set by Stampin' Up!

Retired products are only available through tomorrow, 5/31, or while supplies last. For Your Country is only available in wood mount as the clear has already sold out.

Here are a few cards I posted previously. You can click on the picture to go to the corresponding blog post.
http://stampin-with-sue.blogspot.com/2015/05/happy-memorial-day.html

http://stampin-with-sue.blogspot.com/2015/05/happy-memorial-day.html
The Alphabet Rotary Stamp and Project Life Day to Day Set are both retiring.
http://stampin-with-sue.blogspot.com/2014/07/happy-4th-of-july-for-your-country.html


Sunday, May 29, 2016

NC SU Demos New Catalog Blog Hop


The NC Stampin’ Up! Demonstrators have another great Blog Hop for you this month.  Our theme is New Catalog (Anything Goes). Check out all the wonderful projects as you hop from blog to blog -- and don’t forget to leave some comments.

Remember, new catalog items are available June 1st. On the flip side - retiring items are only available through May 31, so make sure you have everything you want off the retiring list before it's gone. I'll be placing a group order on the 31st and on the 1st, so if you want to be a part of either, get me your order(s) by 5:00pm on the respective day. Or, order online using hostess code  BWH24ZES (unless your order is over $150 - then collect the hostess benefits for yourself). Be sure to allow contact so I can send you a thank you.

I only have one project for you this month. I made it for a shoebox swap for a demonstrator meeting I hosted last weekend. Sadly, I have not had much time to play with my new stuff (but even for demonstrators, sometimes that's how life is). When I get home from vacation I should have time to really get into the new stuff. In the meantime, check back later this week to see the other shoebox swap cards.

I may only have one project, but it features several new products. I've used three of the new In Colors – Dapper Denim, Flirty Flamingo, and Sweet Sugarplum. The left front panel is embossed with one of the two embossing folders included in the Floral Affection embossing folders pack. Live, laugh, love is from the new set Layering Love and die cut with the new Sweet & Sassy Framelits.  Oh, Happy Day is from the new set Thoughtful Banners which is available in a bundle with the Duet Banner Punch. 

You can see this is a fun fold card. The background on Flirty Flamingo is embossed with the Brick Wall embossing folder, which is a current product. I sponged over it lightly with Dapper Denim ink to make the bricks really stand out.

Next is a picture of the card as it is open. Celebrate is from Thoughtful Banners and stamped on a Sweet & Sassy die cut Sweet Sugarplum heart. The Whisper White panel is a place to write your message. I sponged a little around the edge to tie it in with the facing panel and added little hearts with a stamp from Layering Love.

Thanks for stopping by my blog and checking out the blog hop. I invite you to follow me on Pinterest and Facebook.

Pam Staples is the next stamper in the blog hop. I am certain you will enjoy the projects she has to share. To view her Blog, you may click her name or the picture below.

Blog hop next NC
NC SU Demo Blog Hop -May 2016

Jo Anne Hewins - http://luv2create.typepad.com/my_blog/2016/05/hurray-for-the-new-catalog-nc-blog-hop.html

Michelle Irinyi - http://makingmemorieswithmichelle.weebly.com/home/nc-demos-blog-hop-marquee-messages

Melissa Kerman - http://www.stampinup.net/esuite/home/thecraftingtreehouse/blog?directBlogUrl=/blog/60800/entry/thoughtful_banners_with_sweet_sugarplum

Tracie Langley - http://www.stampinup.net/esuite/home/traciesallaboutstamping/blog?directBlogUrl=/blog/86481/entry/nc_demos_may_blog_hop

Sharon Maranich - http://inkiefinger.blogspot.com/2016/05/may-nc-blog-hop-new-catalog-sneak-peeks.html

Sue Root - http://stampin-with-sue.blogspot.com/2016/05/nc-su-demos-new-catalog-blog-hop.html

Pam Staples - http://wp.me/p3p2VA-1pB

Frances Wagner - http://wagstamps.blogspot.com/2016/05/nc-su-demo-hop-team-meeting-swaps-gifts.html

Friday, May 27, 2016

Cheese-y Birthday Card

I can't believe I haven't posted this card yet and now the cute, funny Giggle Greetings set is getting ready to retire. My sister turned 40 last September and she had this awesome party. It was lots of fun! Since it was a milestone birthday and she was going all out, I wanted to make her an extra special card while still being sisterly and poking a little fun at her age. Here's the card I made her.

The stamp on the front is from the retired set Just Sayin' but I thought "You're how old?" was perfect here. The word bubble framelits are also retired. If you don't have this set and coordinating framelits you could just put the mouse there or maybe add a Happy Birthday stamp in the corner. The mouse is just an oval punch for the body and heart punch folded in half for the head with small punches for the eyes and nose. Whiskers are drawn with the retiring white gel pen.Then I punched a small hole (probably using 1/8" circle punch but since I made this last September, that's just a guess) and put some coordinating Baker's Twine through it for the tail. Very easy, but cute (for a mouse).

 It's a trifold card so it opens like this. I put a slice of cheese behind the message on each flap so that it coordinates with the front and keeps the theme throughout. The cheese is just made by punching random circles in a few different sizes and then doing some sponging. Be sure to have some of the circles go off the edge of the cardstock.
 Here's a different shot of this panel so you can see the stamp better. It says, age is something that doesn't count unless you're a cheese. This stamp is from Giggle Greetings. I colored a Basic Rhinestone with a yellow Sharpie and put it on the flame of the candle.
Here's the card all the way open.  I used some assorted messages in here from some different sets including Endless Birthday Wishes and the retired Let Your Hair Down. I figured Never Too Old to Party was appropriate given the bash she was throwing.
 And, of course, I had to decorate the envelope. I used the circles that were cut from the cheese slices and sponged them a bit before SNAILing (is that a verb?) them on the envelope.
 My card was inspired by this one made by my very talented customer, Lynne Sposito.
That's one of the many things I love about stamp club. Stampers often bring projects they've made and share with the group. We all get more ideas that way and it's fun to share in the creativity of others. Stamp club is open to anyone - either with a commitment or without (and just coming on the months you're able). It's offered two times per month and the next ones are Saturday, June 18, 10:00am and Tuesday, June 21, 6:30pm. We'd love to have you join us!

Monday, May 23, 2016

Big News Birthday Card

Here's a quick birthday card made with the Big News stamp set. This was one of our projects at the April class. There are two variations - one with the Woohoo! banner and one without. Stampers were split between which they liked better. How about you? Leave a comment and let me know which one you prefer.

 The washi tape, in color ink, and stamp set are all retiring, so be sure to get what you want before it's gone.
 Here's a close up of the candles. There's Wink of Stella on the stars to give them a little shine.
 We even coordinated the envelope, though as usual, there were many variations. Seems most of the regular stampers like to put their own touch on their envelopes. Here's how I finished my envelope.

Saturday, May 21, 2016

Super Stampin' Fun! [Tutorial]

What's this? Keep reading (or for those of you who are impatient, jump past all the preliminary stuff and go right to the the tutorial) to find out.

I was super excited last week when I got a call from Brandi Barnard at the Stampin' Up! home office in Utah. She told me that she and Brian Pilling would like to come observe one of my classes. Now, if you subscribe to the Stampin' Up! YouTube channel, I'm sure you've seen both of them in SU! videos. If you aren't a subscriber, I highly recommend it. Lots of great videos about your favorite Stampin' Up! products. Watch some of their videos and you'll see why I was so excited (and if you find some items you just have to have, hop on over to my online store and order away - use the current hostess code ZSQU7Q63 and get a special thank you from me).

Brandi and Brian are absolutely as nice and funny and great to spend time with as they seem online. They were so sweet and took my husband and me out to dinner last night. Then today they came to observe my club. It was fun to have them here.

The club members enjoyed meeting them, as well. One of the stampers asked how we rated for a visit from Stampin' Up! and they went on and on about what a wonderful demonstrator I am so really, how could they stay away (okay, so I'm kind of hard of hearing in that ear and so had to guess at their answer, but I imagine that's what they said - and I'm sure they're too nice to contradict me, so that's my story and I'm sticking to it). Seriously, they're checking out several demonstrators' classes in an effort to see what we do so that Stampin' Up! can provide even better training and support. It is such a great company to be a part of (and here's where I add - you, too, can be a part of it, ask me for details or click that link above to the online store and click Join the Fun instead of Shop Now).

The only downer part of the visit is that I completely forgot to take any pictures with them. Worse, I remembered before they got here, so set out my camera right on the table where we have class and I wrote a reminder note and put it by the Big Shot. I got busy setting up and moved the camera aside, picked up the Big Shot to use in class, and that was the last I thought about a picture until I was cleaning up and found the note. So, what's a demonstrator to do? Improvise! I found this picture that I figure is a pretty close representation.
Okay, on to the stuff you come here for. Here's one of the projects we made in class today. It's a Pinwheel Card. I followed the tutorial on Splitcoast Stampers, but modified the size. Thank you to my math teachers for teaching me how to calculate ratios. I'll give you some quick instructions here, but for more details and a video, follow the link above to Splitcoast.

Here are two versions of the card while closed. This cute DSP, Go Wild Designer Series Paper Stack, is great for masculine or feminine projects. It is retiring, as are the Six Sided Sampler stamp set, Hexagon punch, and Diagonal Score Plate (which has a big discount!). Luckily, Timeless Textures, is carrying over to the Annual Catalog.
Start with a 6 x 6 piece of DSP. Use the Diagonal Score Plate to score all four sides at 2.25". The design that is down will be the inside pattern.

The score lines will converge in the middle of each side to form a triangle. Cut out these triangles from each side.

Remove the Diagonal Score Plate from the Simply Scored Board so you can make vertical score lines. With side that was face down for the first round of scoring now facing up, score at 3/4" on each side (stop when you reach the cut out triangle).

The diagonal score lines will fold in (closing the card) and the straight score lines will fold out. Use your bone folder to gets nice creases. This is what the inside of the card looks like when open. There's a 2 5/16" piece of Whisper White cardstock in the center which has been stamped with the flourish from Timeless Textures and sponged around the edges.
 Fold each flap down in a clockwise direction.
When you get to the last flap, tuck it under to hold it closed.
Decorate the front however you desire. If you do a hexagon or other object, make sure to only put adhesive on the part that will adhere to one flap. If you adhere it to more than one flap the card won't open properly. I know, pretty obvious - but that's just the kind of thing that can be forgotten/overlooked while caught up in the excitement of creating (please tell me I'm not the only one who does this).

The tutorial on Splitcoast makes a bigger card. Start with an 8 x 8 piece of DSP. Diagonal score lines are at 3" and vertical score lines are at 1".

You missed today's class and the opportunity to meet Brandi and Brian, but you can still come to Tuesday evening's class. In addition to making three cute projects, you'll have a great time hanging out with a lively, chatty, friendly group of stampers. You can see the other projects here and here (or just keep scrolling down).

Contact me today to reserve your spot and get directions if needed.

Friday, May 20, 2016

Open Sea Best Dad Ever

These cards feature some of my favorite masculine sets, the versatile sentiment set And Many More, and the all around useful set Timeless Textures. We will make the top one in the May class. There's room if you'd like to join us.

Stamps on the front are from And Many More and Open Sea. The decorative lines in the corners are made with the Diagonal Score Board. I turned down one corner as if the ship's log had endured a hard life at sea, but it could also be taped down if that's more your style. The sponging also helps with that aged look. It's hard to see in the picture, but I added Dazzling Details to make the water sparkle.
 This sweet inside sentiment comes from Guy Greetings, a must have set if you have important men in your life. The "sea water" along the bottom is made with a stamp from Timeless Textures.
 Here's a collage style card using a couple of the same sets and techniques.
Several of these products are retiring, so be sure to get them before they are gone! The Diagonal Score Board has a pretty big discount. Dazzling Details, And Many More,and Open Sea are also on their way out.


Thursday, May 19, 2016

Playful Pals Frogs

These cute frogs were made with the items from the Playful Pals Bundle (Playful Pals stamp set and Pyramid Pals thinlits) and the Big Shot. I made a boy frog and a girl frog.

 The bow is Melon Mambo cotton ribbon and the heart is from the Owl Punch. This idea is CASEd from Miss Pinks Craft Spot.
We'll be making these at this month's class. Everyone will get to choose which one they want to make. There's still room - contact me today if you'd like to come (Saturday 5/21 or Tuesday 5/24).

Saturday, May 14, 2016

Record Album Flip Card - Classic Rock

I thought this card was so clever when I saw it on Pinterest. It is cased from Michelle Reynolds. We made it in one of my classes.

 Sadly, the Circle Card Thinlits Die is retiring. Happily, it is discounted and still available (but only while supplies last or through 5/31/16, whichever comes first). The Designer Series Paper (DSP), It's My Party, is also retiring. I chose this design to coordinate with the chevrons which come in the die set. The stamp is from Bombs Away.
Here's the card standing and partially open so you can see as the circle starts to flip.
 The card pulls open and is laying flat here. The Happy Birthday is from Sky Is the Limit. That set is no longer available, but if you want it, I can hook you up with one.
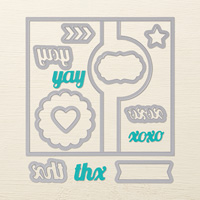
Don't forget to get the retiring items before they are gone. These circle flip cards are so cool and very easy with this great die. Other dies come in the set as you can see in this picture.
Circle Card Thinlits Dies by Stampin' Up!

Monday, May 9, 2016

Serene Silhouettes Post It Note Holders

You may remember the Post It Note Holder I shared as part of the NC SU Demos Blog Hop a few months ago. My stampers liked it so much they asked to make one in class. By the time we did, most of the items were retired, so I re-designed it using DSP from the Pretty Petals Designer Series Paper Stack and a stamp from Serene Silhouettes. Everyone got to choose the piece of DSP they wanted for their base. Here are some of the variations made by my customers:

 It's hard to see, but there's Dazzling Details on the flowers. Random Post It notes are stamped for a little surprise as the pack gets used. That's coordinating DSP on plain clothespins.
 As you can see, Corothy put her flowers at an angle and decided not to add a clothespin.
We crafted a little easel back from the cardboard from a DSP pack. The coasters and Post It notes are not Stampin' Up!, but you could buy the retiring coaster board and cut your own any size you'd like.

All SU! products used on these projects (except the corner rounder punch) are retiring, so be sure to get them before they are gone.

Friday, May 6, 2016

Going Global Lucky Stars

I love the Going Global suite of products. It's great for masculine cards, but doesn't have to be limited to projects for men. The Lucky Stars embossing folder made the cut for another year, but the Going Global stamp set and Going Places Designer Series Paper (DSP) are both retiring. Be sure to get yours before they're gone
I used Wink of Stella on a few random stars and on the constellation to add some sparkly shine. You can see it a little better in this close-up. The medallion was punched with a scallop circle punch, then rotated half a scallop and punched again.
Isn't the saying great? I thank my luck stars for you. That's how I feel about my customers who make it possible for me to be a Stampin' Up! demonstrator. Thank you!

Monday, May 2, 2016

May 2016 Paper Pumpkin (spoiler alert)

Stampin' Up! has given a sneak peek of the May Paper Pumpkin. It looks great and I'm excited to get it! You can sign up here. Better yet, buy it from my website using the current hostess code (ZSQU7Q63) and then follow the link to enter your Paper Pumpkin code. That way you get the thank you from me for using the hostess code when you order. I believe I read the kit makes 8 cards. Remember, you must be signed up at the Paper Pumpkin site by May 10 to get this kit.
The kit makes the cards on the left. The projects on the right are alternate ideas. The item in the bottom right corner looks like the stamp set.

*Thursday, June 9, 7:00pm: Stamp and Sip (think Wine and Design for stamping). Buy the May Paper Pumpkin kit and we'll assemble them at Stamp and Sip. Like Wine and Design, bring your own beverage and snacks. Socializing begins at 6:30pm for those who can make it earlier; stamping begins at 7:00pm.

Questions about Paper Pumpkin or how to sign up? Just ask. I'm happy to help. 

Thanks to Stampin' Up! and my upline Frances Wagner for the pictures.

LinkWithin

Related Posts Plugin for WordPress, Blogger...